基础环境准备
节点规划
| 名称 | 描述 | 管理IP | (虚拟机)内部IP | 配置 |
|---|---|---|---|---|
| ctl01 | 控制节点 | 10.191.101.128/24 | 192.168.80.128/24 | 2C2G |
| compute01 | 计算节点 | 10.191.101.129/24 | 192.168.80.129/24 | 2C4G |
| neutron01 | 网络节点 | 10.191.101.130/24 | 192.168.80.130/24 | 2C2G |
| cinder01 | 存储节点 | 10.191.101.131/24 | 192.168.80.131/24 | 2C2G |
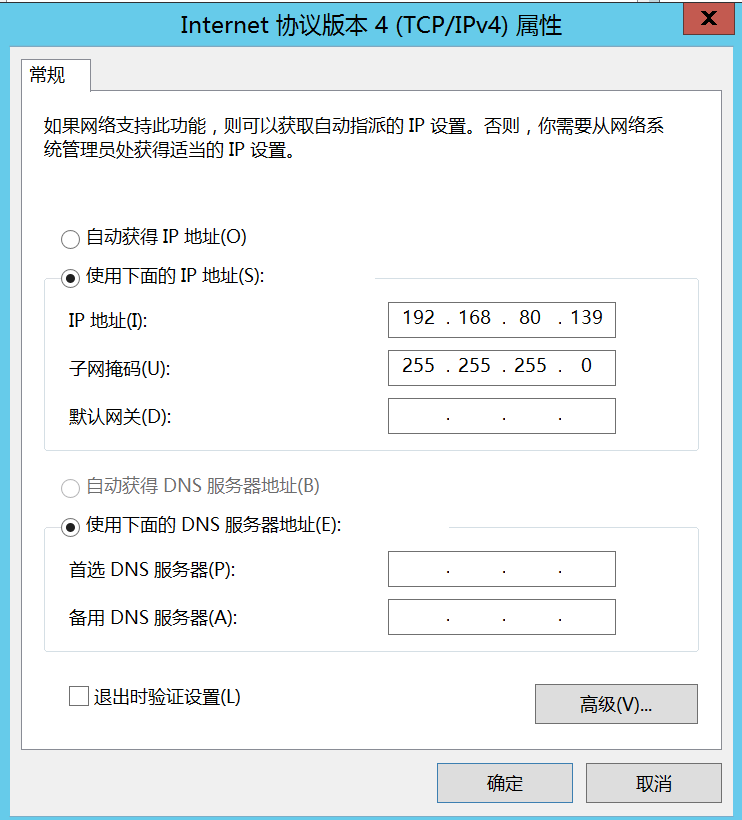
| (新增)compute02 | 计算节点(win) | - | 192.168.80.139/24 | 2C2G |
系统版本
CentOS Linux release 7.6.1810 (Core)
cat /etc/redhat-release自动补全
yum install bash-completion下载包到本地
wget -erobots=off -m -c -np --reject=html,gif,A,D -nH --cut-dirs=4 -P /opt/ http://mirrors.aliyun.com/centos/7/cloud/x86_64/openstack-train/配置本地YUM
/etc/yum.repos.d/Openstack-Train.repo
[Openstack-Train]
name=Openstack-Train
baseurl=file:///opt/openstack-train/
enabled=1
gpgcheck=0
挂载光盘
mkdir /mnt/cdrom
mount -t iso9660 -o loop /dev/cdrom /mnt/cdrom
cat /etc/yum.repos.d/CentOS-iso.repo
[CenOS-iso]
name=CenOS-iso
baseurl=file:///mnt/cdrom/
enabled=1
gpgcheck=0
写入配置文件,/etc/fstab
/dev/cdrom /mnt/cdrom iso9660 defaults,loop 0 0启用YUM缓存
[root@centos7 ~]# cat /etc/yum.conf
[main]
cachedir=/var/cache/yum/$basearch/$releasever
keepcache=1
基础工具安装
yum -y install net-tools
yum -y install wget
更改主机名
- 不同角色不同名字分别设置
hostnamectl set-hostname ctl01
hostnamectl set-hostname compute01
hostnamectl set-hostname neutron01
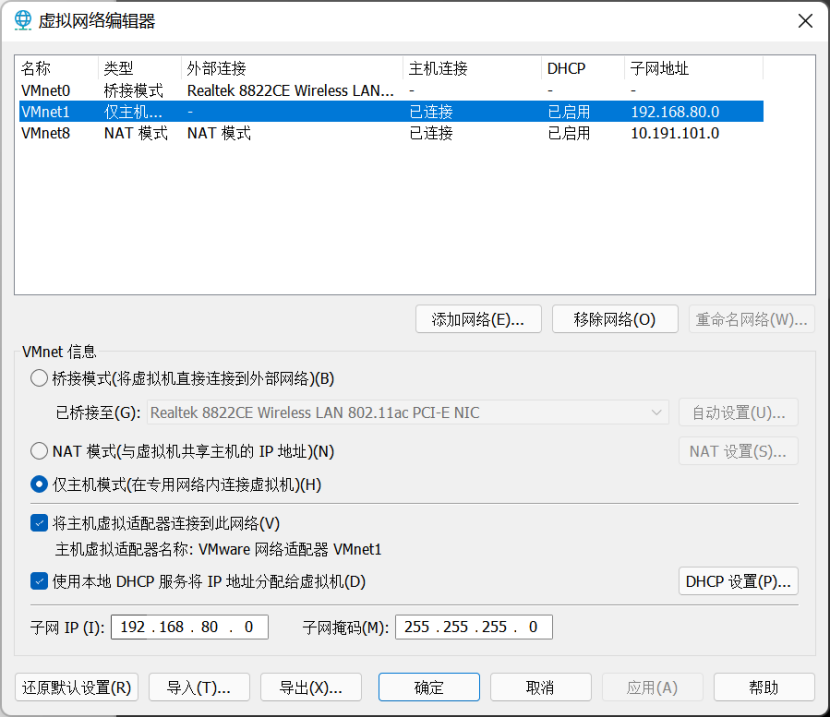
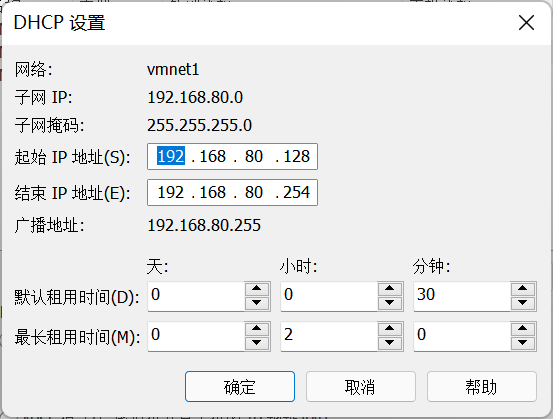
hostnamectl set-hostname cinder01配置网络
由于使用VMware Workstation进行部署,需要更改原有的网络配置
主机管理网络
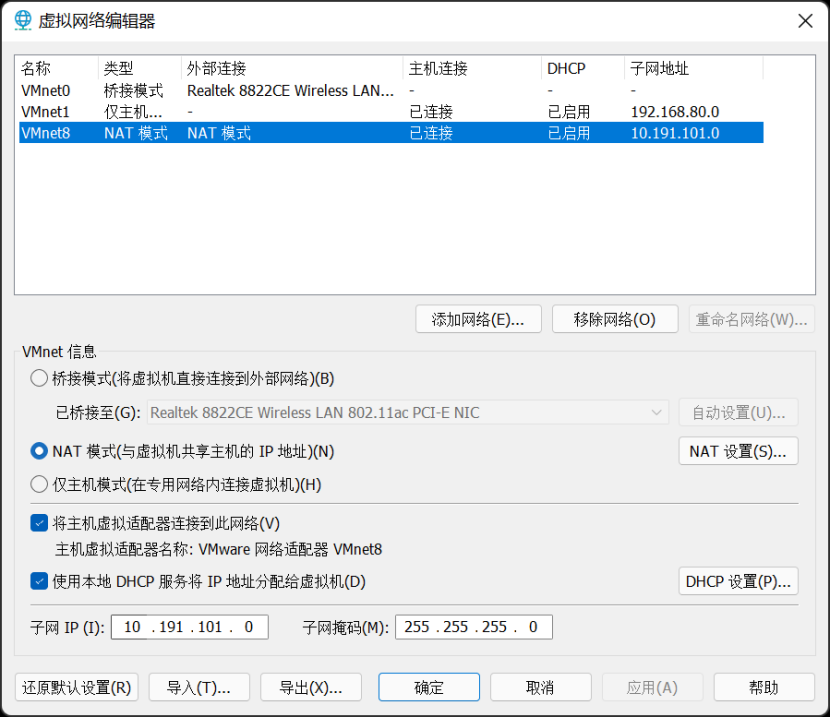
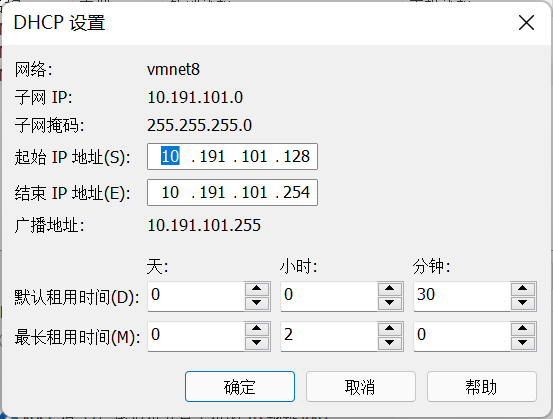
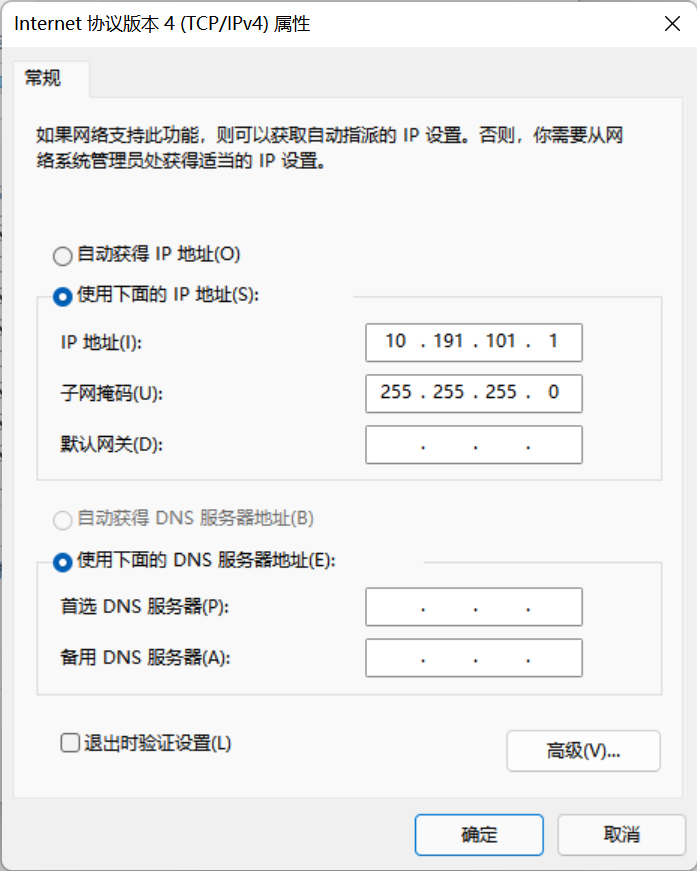
注意NAT设置中,设置的网关IP与本机对应虚拟网卡IP不可一致,否则无法正常与外网通信,该问题由于VMware Workstation虚拟实现的NAT和DHCP造成,网关是虚拟机的交换设备,本机vmnet8和对应ip则作为通信载体,不可使用同一个IP
相关参考:https://blog.51cto.com/u_13648313/2164309
NAT配置网关为10.191.101.2
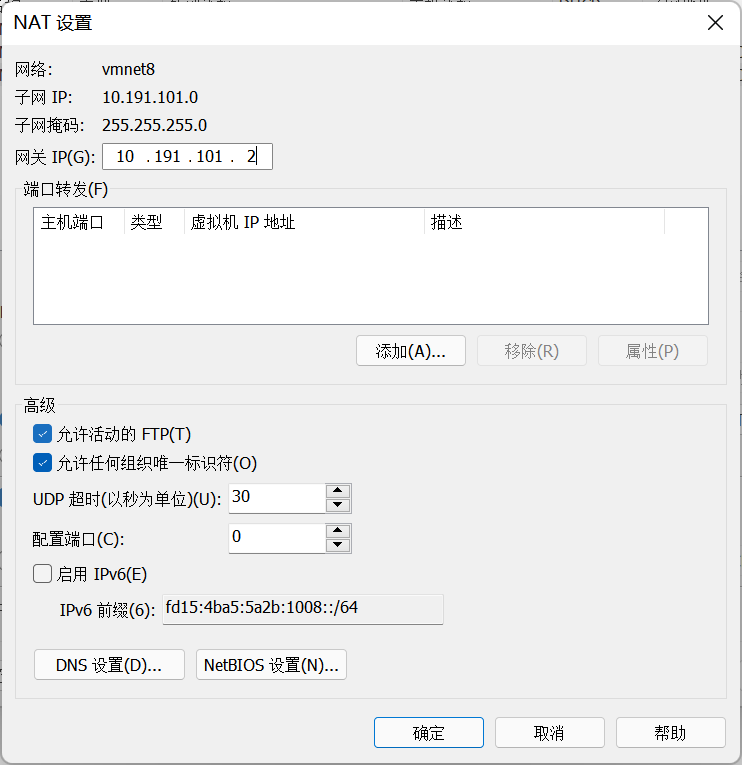
主机对应网卡地址则配置为10.191.101.1,此外需指定配置DNS Server,否则虚拟主机无法解析域名,如果部分虚拟机无法正常获取DNS Server地址,亦可在虚拟机网卡配置中写入DNS Server
控制节点
cat /etc/sysconfig/network-scripts/ifcfg-ens33
TYPE=Ethernet
BOOTPROTO=static
DEFROUTE=yes
NAME=ens33
DEVICE=ens33
ONBOOT=yes
IPADDR=10.191.101.128
NETMASK=255.255.255.0
GATEWAY=10.191.101.2
计算节点
cat /etc/sysconfig/network-scripts/ifcfg-ens33
TYPE=Ethernet
BOOTPROTO=static
DEFROUTE=yes
NAME=ens33
DEVICE=ens33
ONBOOT=yes
IPADDR=10.191.101.129
NETMASK=255.255.255.0
GATEWAY=10.191.101.2
虚拟机流量网络
控制节点
cp /etc/sysconfig/network-scripts/ifcfg-ens33 /etc/sysconfig/network-scripts/ifcfg-ens34cat /etc/sysconfig/network-scripts/ifcfg-ens34
TYPE=Ethernet
BOOTPROTO=static
DEFROUTE=yes
NAME=ens34
DEVICE=ens34
ONBOOT=yes
IPADDR=192.168.80.128
NETMASK=255.255.255.0
计算节点 cat /etc/sysconfig/network-scripts/ifcfg-ens34
TYPE=Ethernet
BOOTPROTO=static
DEFROUTE=yes
NAME=ens34
DEVICE=ens34
ONBOOT=yes
IPADDR=192.168.80.129
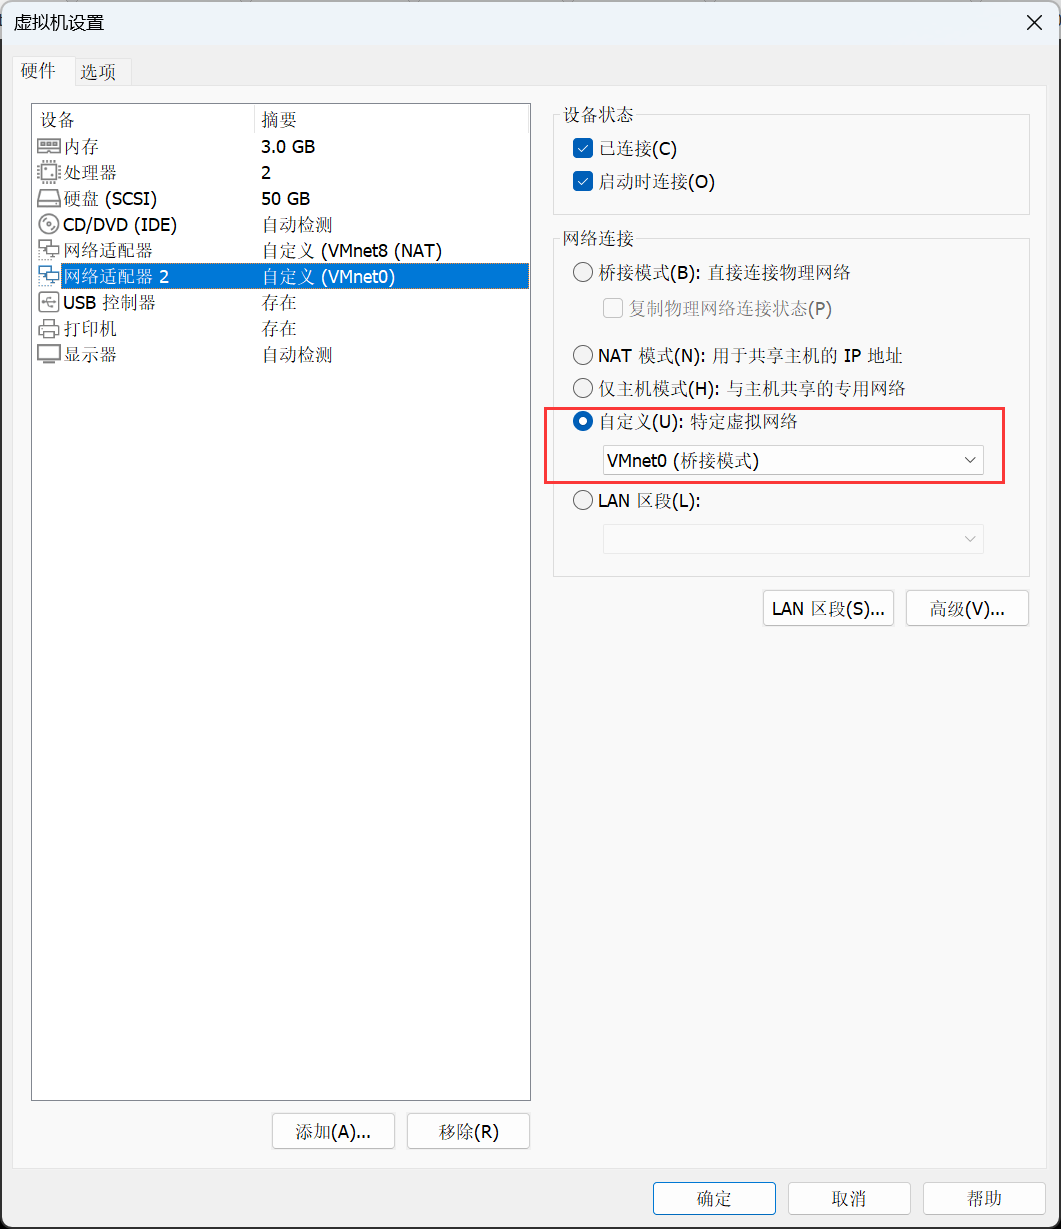
NETMASK=255.255.255.0新增win compute对网络的调整(可选)
在hyperv交换机管理新增一个内部交换机
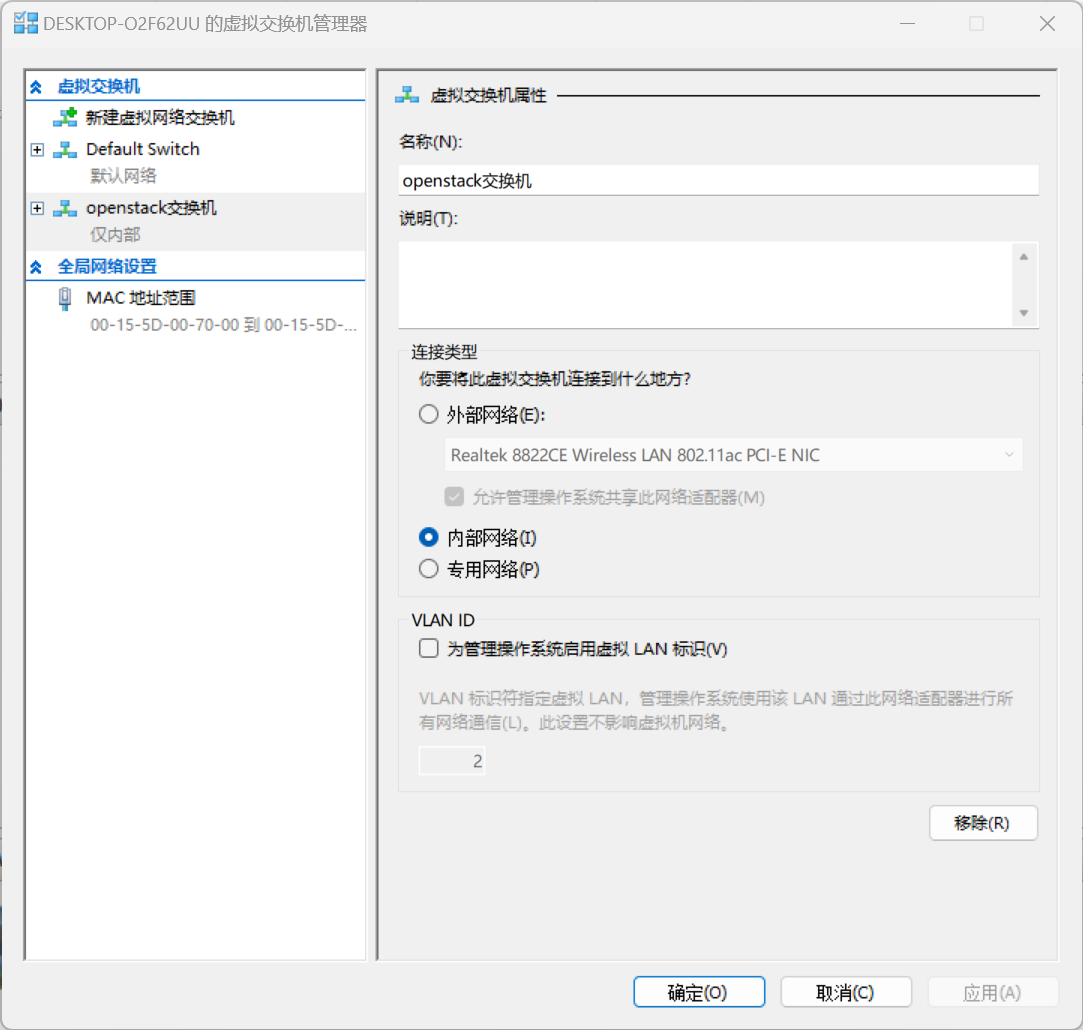
在宿主机(本机)确认创建的交换机信息
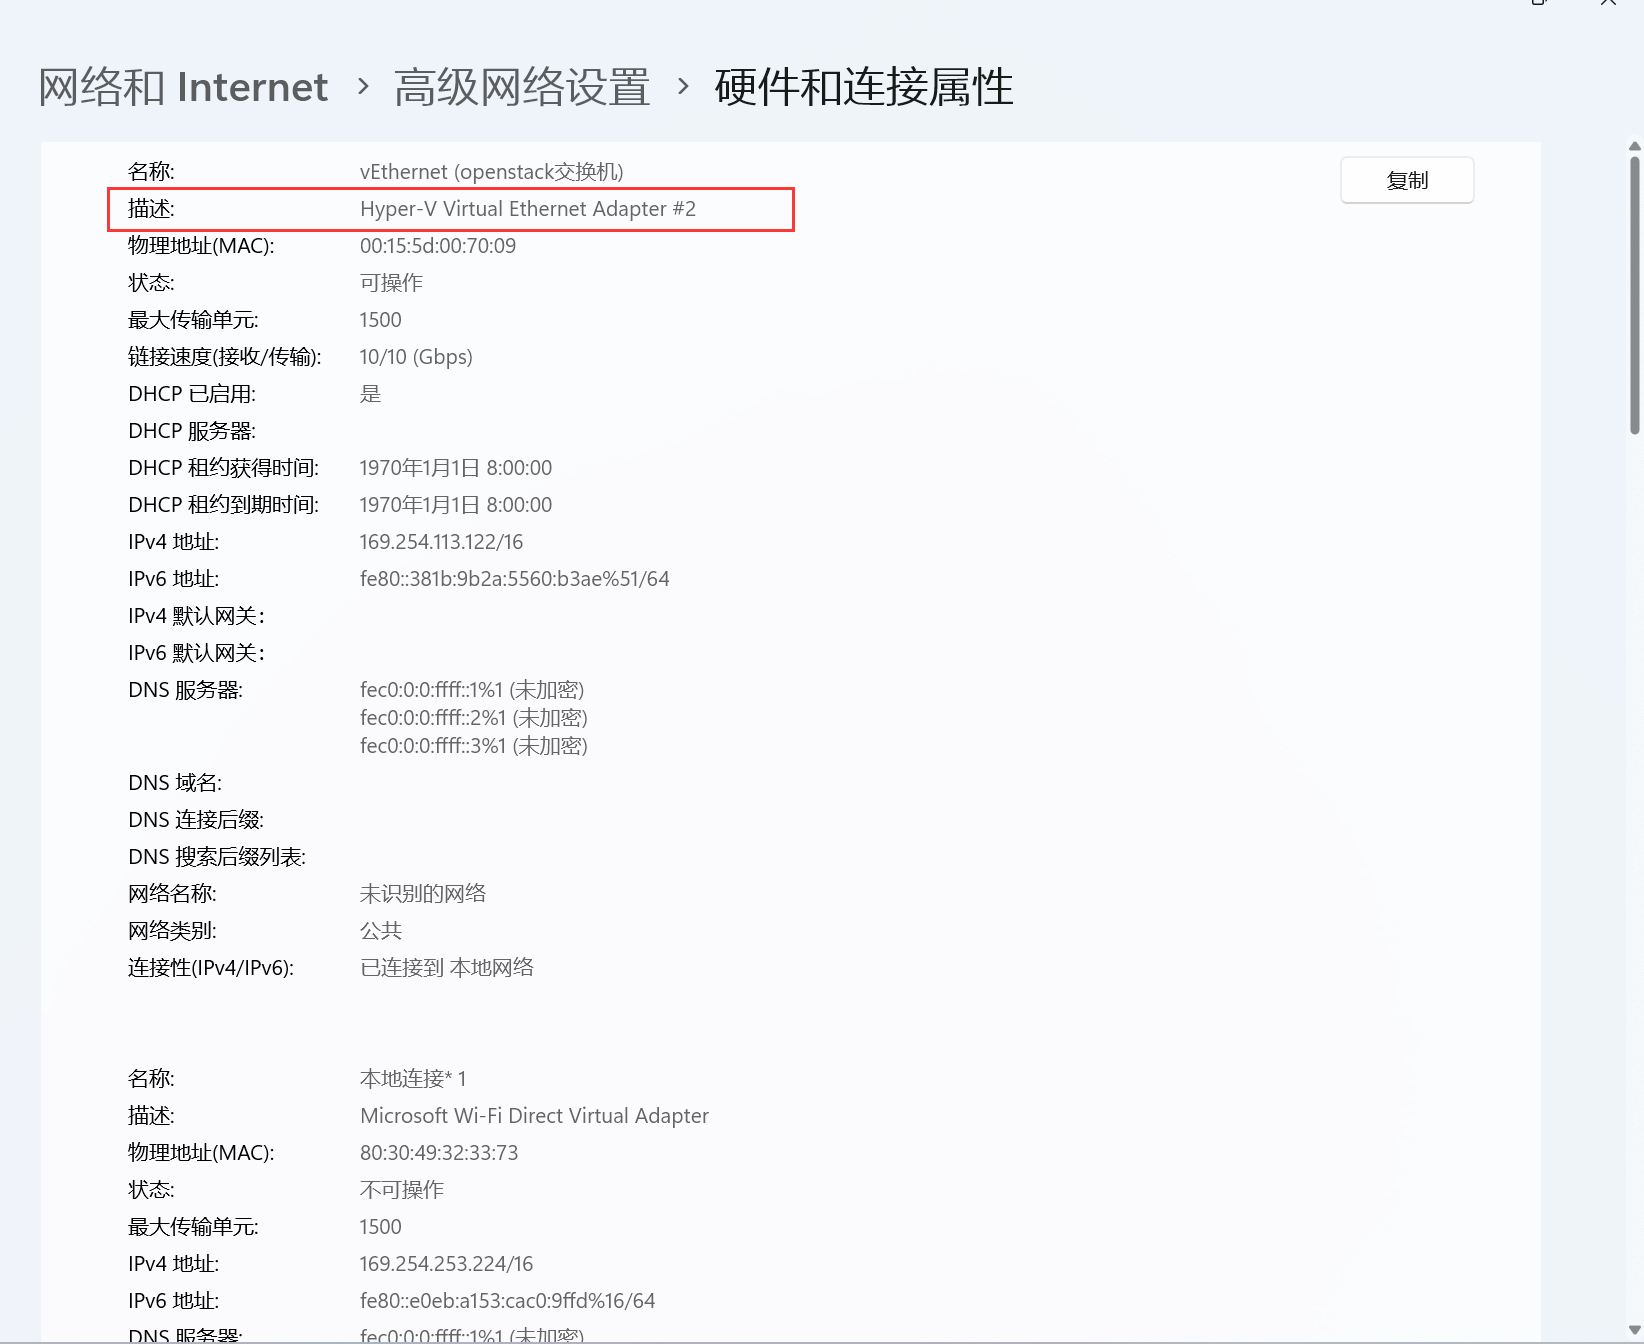
在workstation中修改或创建桥接网络到hyperv虚拟交换机
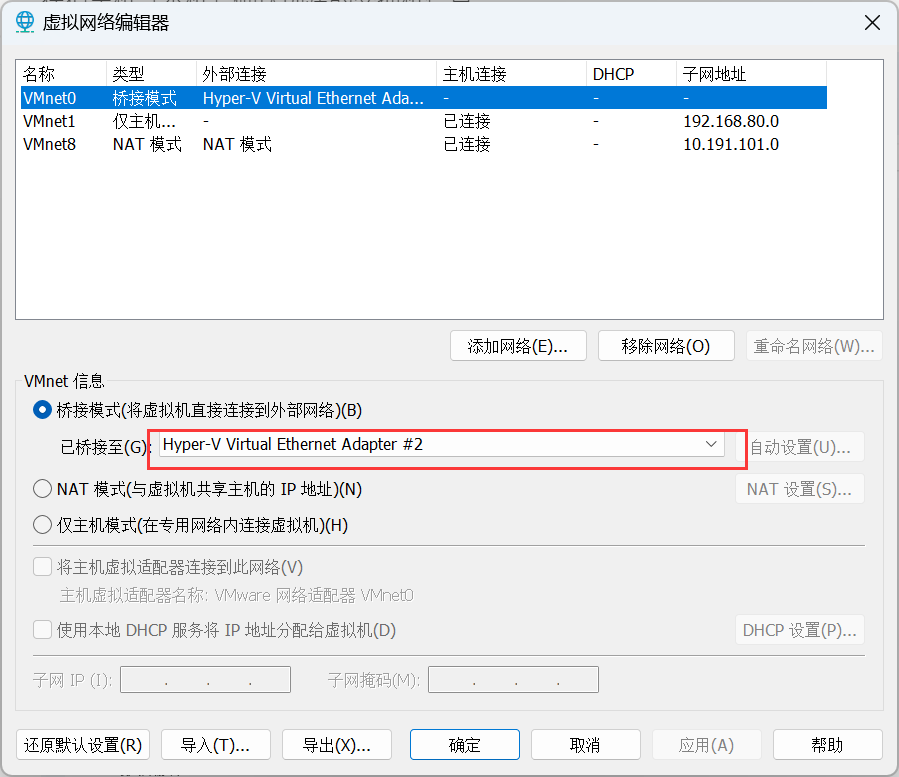
调整其他openstack节点,例如控制节点,连接到桥接hyperv交换机的网卡
在hyperv虚拟机(计算节点)中配置与其他节点指定网卡同网段地址测试
测试网络连接

关闭selinux
sed -i 's|SELINUX=enforcing|SELINUX=disabled|' /etc/selinux/config连接数配置
echo '* soft nofile 65530
* hard nofile 65530
* soft nproc 65530
* hard nproc 65530'>>/etc/security/limits.conf
关闭防火墙
systemctl disable firewalld
systemctl stop firewalld
关闭NetworkManager
systemctl disable NetworkManager
systemctl stop NetworkManager
HOSTS文件配置
echo '10.191.101.128 ctl01
10.191.101.129 compute01
10.191.101.130 neutron01
10.191.101.131 cinder01
10.191.101.140 ceph01'>>/etc/hosts
NTP时钟同步
yum install -y chrony计算节点将server修改为控制节点ip
echo "server 10.191.101.128 iburst" >> /etc/chrony.conf同步时间
systemctl enable chronyd.service
systemctl restart chronyd.service
chronyc sources
数据库
Most OpenStack services use an SQL database to store information.
安装软件包
yum install mariadb mariadb-server python2-PyMySQL创建并编辑 /etc/my.cnf.d/openstack.cnf
[mysqld]
bind-address = 10.191.101.128
default-storage-engine = innodb
innodb_file_per_table
max_connections = 4096
collation-server = utf8_general_ci
character-set-server = utf8
启动数据库,配置开机启动
systemctl enable mariadb.service
systemctl restart mariadb.service
初始化数据库,本次测试配置密码为Abc-1234
mysql_secure_installation(可选)配置远程root登录
Welcome to the MariaDB monitor.  Commands end with ; or \g.
Your MariaDB connection id is 16
Server version: 10.3.20-MariaDB MariaDB Server

Copyright (c) 2000, 2018, Oracle, MariaDB Corporation Ab and others.

Type 'help;' or '\h' for help. Type '\c' to clear the current input statement.

MariaDB [(none)]> use mysql;
Reading table information for completion of table and column names
You can turn off this feature to get a quicker startup with -A

Database changed
MariaDB [mysql]> select host,user from user;
+-----------+------+
| host      | user |
+-----------+------+
| 127.0.0.1 | root |
| ::1       | root |
| ctl01     | root |
| localhost | root |
+-----------+------+
4 rows in set (0.000 sec)

MariaDB [mysql]> GRANT ALL PRIVILEGES ON *.* TO 'root'@'%' IDENTIFIED BY 'Abc-1234' WITH GRANT OPTION;
Query OK, 0 rows affected (0.000 sec)

MariaDB [mysql]> select host,user from user;
+-----------+------+
| host      | user |
+-----------+------+
| %         | root |
| 127.0.0.1 | root |
| ::1       | root |
| ctl01     | root |
+-----------+------+
4 rows in set (0.000 sec)

MariaDB [mysql]> FLUSH PRIVILEGES;
Query OK, 0 rows affected (0.000 sec)
消息队列
OpenStack uses a message queue to coordinate operations and status information among services.
安装
yum install rabbitmq-server开机启动
systemctl enable rabbitmq-server.service
systemctl restart rabbitmq-server.service
新增openstack用户
rabbitmqctl add_user openstack Abc-1234为用户配置权限
rabbitmqctl set_permissions openstack ".*" ".*" ".*"检查状态
systemctl status rabbitmq-server.service
netstat -nltp | grep 5672
Memcached
The Identity service authentication mechanism for services uses Memcached to cache tokens.
安装
yum install memcached python-memcached配置/etc/sysconfig/memcached,允许访问的ip
Configure the service to use the management IP address of the controller node. This is to enable access by other nodes via the management network
PORT="11211"
USER="memcached"
MAXCONN="1024"
CACHESIZE="64"
OPTIONS="-l 127.0.0.1,::1,ctl01"
配置开机启动
systemctl enable memcached.service
systemctl restart memcached.service
检查状态
systemctl status memcached.service
netstat -nltup | grep 11211
Etcd
OpenStack services may use Etcd, a distributed reliable key-value store for distributed key locking, storing configuration, keeping track of service live-ness and other scenarios.
安装
yum install etcd备份和修改配置
cp -a /etc/etcd/etcd.conf{,.bak}set the
ETCD_INITIAL_CLUSTER,ETCD_INITIAL_ADVERTISE_PEER_URLS,ETCD_ADVERTISE_CLIENT_URLS,ETCD_LISTEN_CLIENT_URLSto the management IP address of the controller node to enable access by other nodes via the management network
#[Member]
ETCD_DATA_DIR="/var/lib/etcd/default.etcd"
ETCD_LISTEN_PEER_URLS="http://10.191.101.128:2380"
ETCD_LISTEN_CLIENT_URLS="http://10.191.101.128:2379"
ETCD_NAME="ctl01"
#[Clustering]
ETCD_INITIAL_ADVERTISE_PEER_URLS="http://10.191.101.128:2380"
ETCD_ADVERTISE_CLIENT_URLS="http://10.191.101.128:2379"
ETCD_INITIAL_CLUSTER="ctl01=http://10.191.101.128:2380"
ETCD_INITIAL_CLUSTER_TOKEN="etcd-cluster-01"
ETCD_INITIAL_CLUSTER_STATE="new"
配置开机启动和检查状态
systemctl enable etcd
systemctl restart etcd
systemctl status etcd
密码规划
| Password name | Description | Key |
| Database password (no variable used) | Root password for the database | Abc-1234 |
| ADMIN_PASS | Password of user admin | Abc-1234 |
| CINDER_DBPASS | Database password for the Block Storage service | Abc-1234 |
| CINDER_PASS | Password of Block Storage service user cinder | Abc-1234 |
| DASH_DBPASS | Database password for the Dashboard | Abc-1234 |
| DEMO_PASS | Password of user demo | Abc-1234 |
| GLANCE_DBPASS | Database password for Image service | Abc-1234 |
| GLANCE_PASS | Password of Image service user glance | Abc-1234 |
| KEYSTONE_DBPASS | Database password of Identity service | Abc-1234 |
| METADATA_SECRET | Secret for the metadata proxy | Abc-1234 |
| NEUTRON_DBPASS | Database password for the Networking service | Abc-1234 |
| NEUTRON_PASS | Password of Networking service user neutron | Abc-1234 |
| NOVA_DBPASS | Database password for Compute service | Abc-1234 |
| NOVA_PASS | Password of Compute service user nova | Abc-1234 |
| PLACEMENT_PASS | Password of the Placement service user placement | Abc-1234 |
| RABBIT_PASS | Password of RabbitMQ user openstack | Abc-1234 |
Minimal deployment for Train
本次安装train版本,其他版本可参考官网相关手册,最小化的train版本安装必须包含下面的这些服务,逐步开始
At a minimum, you need to install the following services. Install the services in the order specified below
-
Identity service – keystone installation for Train https://docs.openstack.org/keystone/train/install/
-
Image service – glance installation for Train https://docs.openstack.org/glance/train/install/
-
Placement service – placement installation for Train https://docs.openstack.org/placement/train/install/
-
Compute service – nova installation for Train https://docs.openstack.org/nova/train/install/
-
Networking service – neutron installation for Train https://docs.openstack.org/neutron/train/install/
We advise to also install the following components after you have installed the minimal deployment services
-
Dashboard – horizon installation for Train https://docs.openstack.org/horizon/train/install/
-
Block Storage service – cinder installation for Train https://docs.openstack.org/cinder/train/install/
Keystone
The OpenStack Identity service provides a single point of integration for managing authentication, authorization, and a catalog of services.
先决条件
在配置 OpenStack 身份认证服务前,必须创建一个数据库和管理员令牌
登录数据库
mysql -u root -p创建和配置数据表
CREATE DATABASE keystone;对keystone数据库授予恰当的权限
GRANT ALL PRIVILEGES ON keystone.* TO 'keystone'@'localhost' IDENTIFIED BY 'Abc-1234';
GRANT ALL PRIVILEGES ON keystone.* TO 'keystone'@'%' IDENTIFIED BY 'Abc-1234';
配置组件
安装组件
yum install openstack-keystone httpd mod_wsgi备份和配置/etc/keystone/keystone.conf
cp /etc/keystone/keystone.conf{,.bak}cat /etc/keystone/keystone.conf|egrep -v "#|^$"
[database]
connection = mysql+pymysql://keystone:Abc-1234@ctl01/keystone
[token]
provider = fernet填充数据库并验证
su -s /bin/sh -c "keystone-manage db_sync" keystone
mysql keystone -e 'show tables'
ERROR 1045 (28000): Access denied for user 'root'@'localhost' (using password: NO)
报错处理,备份和修改配置
cp /etc/my.cnf.d/mariadb-server.cnf{,.bak}
cat /etc/my.cnf.d/mariadb-server.cnf|grep -vi "^$\|#"
[mysqld]
skip-grant-tables
重启数据库检查
systemctl restart mariadb.service
mysql keystone -e 'show tables'
+------------------------------------+
| Tables_in_keystone                 |
+------------------------------------+
初始化Fernet keys
keystone-manage fernet_setup --keystone-user keystone --keystone-group keystone
keystone-manage credential_setup --keystone-user keystone --keystone-group keystone
引导身份服务
keystone-manage bootstrap --bootstrap-password Abc-1234 \
--bootstrap-admin-url http://ctl01:5000/v3/ \
--bootstrap-internal-url http://ctl01:5000/v3/ \
--bootstrap-public-url http://ctl01:5000/v3/ \
--bootstrap-region-id RegionOne
配置Apache HTTP服务器
配置servername为控制节点
cat /etc/httpd/conf/httpd.conf|grep "ServerName"
# ServerName gives the name and port that the server uses to identify itself.
ServerName ctl01
创建配置文件软连接
ln -s /usr/share/keystone/wsgi-keystone.conf /etc/httpd/conf.d/配置开机启动和检查状态
systemctl enable httpd.service
systemctl restart httpd.service
systemctl status httpd.service
为admin用户添加环境变量
cat >> ~/admin-openrc << EOF
export OS_USERNAME=admin
export OS_PASSWORD=Abc-1234
export OS_PROJECT_NAME=admin
export OS_USER_DOMAIN_NAME=Default
export OS_PROJECT_DOMAIN_NAME=Default
export OS_AUTH_URL=http://ctl01:5000/v3
export OS_IDENTITY_API_VERSION=3
EOF
创建域,项目,用户和角色
创建域的方法
source admin-openrc
openstack domain create --description "An Example Domain" example
-bash: openstack: command not found
报错处理,安装openstack客户端
yum install python-openstackclient创建service项目
openstack project create --domain default --description "Service Project" service创建myproject项目
openstack project create --domain default --description "Demo Project" myproject创建myuser用户,此处密码使用Abc-1234(—password-prompt为交互式,—password+密码为非交互式)
openstack user create --domain default --password-prompt myuser创建myrole角色
openstack role create myrole查看角色
[root@ctl01 ~]# openstack role list
+----------------------------------+--------+
| ID                               | Name   |
+----------------------------------+--------+
| 4bd9bb8d39564e99abefb2d576b72f7e | member |
| 5171abb30ef24b11b31f58f5cffe81a1 | myrole |
| 8e1a7c8613a045949fbc1ecdb14dcfe7 | reader |
| bfc42249d4504d908ea2c416ce655a4f | admin  |
+----------------------------------+--------+
将角色添加到myproject项目和myuser用户
openstack role add --project myproject --user myuser myrole验证
取消环境变量
unset OS_AUTH_URL OS_PASSWORDadmin用户请求令牌验证
openstack --os-auth-url http://ctl01:5000/v3 \
--os-project-domain-name Default \
--os-user-domain-name Default \
--os-project-name admin \
--os-username admin token issue
myuser用户请求令牌验证
openstack --os-auth-url http://ctl01:5000/v3 \
--os-project-domain-name Default \
--os-user-domain-name Default \
--os-project-name myproject \
--os-username myuser token issue
验证环境变量配置
source admin-openrc
openstack token issue
Glance
创建和配置数据库
mysql -u root -p
CREATE DATABASE glance;
GRANT ALL PRIVILEGES ON glance.* TO 'glance'@'localhost' IDENTIFIED BY 'Abc-1234';
GRANT ALL PRIVILEGES ON glance.* TO 'glance'@'%' IDENTIFIED BY 'Abc-1234';
flush privileges;
创建glance用户
source admin-openrc
openstack user create --domain default --password-prompt glance
将admin加入service项目和glance用户
openstack role add --project service --user glance admin创建glance服务实体
openstack service create --name glance --description "OpenStack Image" image创建glance服务API端点,OpenStack使用三种API端点变种代表每种服务:admin、internal、public
openstack endpoint create --region RegionOne image public http://ctl01:9292
openstack endpoint create --region RegionOne image internal http://ctl01:9292
openstack endpoint create --region RegionOne image admin http://ctl01:9292
安装glance软件包
yum install openstack-glance编辑glance配置文件 /etc/glance/glance-api.conf
cp -a /etc/glance/glance-api.conf{,.bak}
grep -Ev '^$|#' /etc/glance/glance-api.conf.bak > /etc/glance/glance-api.conf
openstack-utils能够让openstack安装更加简单,直接在命令行修改配置文件
yum install openstack-utils修改配置文件
配置数据库访问
openstack-config --set /etc/glance/glance-api.conf database connection mysql+pymysql://glance:Abc-1234@ctl01/glance配置身份服务访问
openstack-config --set /etc/glance/glance-api.conf keystone_authtoken www_authenticate_uri   http://ctl01:5000
openstack-config --set /etc/glance/glance-api.conf keystone_authtoken auth_url  http://ctl01:5000
openstack-config --set /etc/glance/glance-api.conf keystone_authtoken memcached_servers  ctl01:11211
openstack-config --set /etc/glance/glance-api.conf keystone_authtoken auth_type  password
openstack-config --set /etc/glance/glance-api.conf keystone_authtoken project_domain_name  Default
openstack-config --set /etc/glance/glance-api.conf keystone_authtoken user_domain_name  Default
openstack-config --set /etc/glance/glance-api.conf keystone_authtoken project_name  service
openstack-config --set /etc/glance/glance-api.conf keystone_authtoken username  glance
openstack-config --set /etc/glance/glance-api.conf keystone_authtoken password  Abc-1234
openstack-config --set /etc/glance/glance-api.conf paste_deploy flavor  keystone
配置本地文件系统和镜像文件位置
openstack-config --set /etc/glance/glance-api.conf glance_store stores  file,http
openstack-config --set /etc/glance/glance-api.conf glance_store default_store  file
openstack-config --set /etc/glance/glance-api.conf glance_store filesystem_store_datadir  /var/lib/glance/images/
填充数据库
su -s /bin/sh -c "glance-manage db_sync" glance
# 忽略此输出中的任何弃用消息
开机启动
systemctl enable openstack-glance-api.service
systemctl restart openstack-glance-api.service
systemctl status openstack-glance-api.service
glance 启动报错处理:注意配置文件中是否含有特殊编码字符,在文本编辑器中检查
Dec 18 10:09:28 ctl01 glance-api[7727]: ERROR: 'ascii' codec can't decode byte 0xc2 in position 11: ordinal not in range(128)
解决方式:更换编码方式 问题原因,ascii编码方式不能编码其他的内容 在 cd /usr/lib/python2.7/site-packages/目录下新建一个文件sitecustomize.py 内容为
# sitecustomize.py
# this file can be anywhere in your Python path,
# but it usually goes in ${pythondir}/lib/site-packages/
import sys
sys.setdefaultencoding('utf-8')
再填充数据库即可
验证
下载cirros镜像
source admin-openrc
wget http://download.cirros-cloud.net/0.4.0/cirros-0.4.0-x86_64-disk.img
# 速度较慢,可浏览器进行下载后上传到控制节点
上传镜像
# 不推荐使用官方文档glance image-create这样的写法,新版本的OpenStack已经不支持,统一使用以openstack开头的命令写法

openstack image create --file ~/cirros-0.4.0-x86_64-disk.img --disk-format qcow2 --container-format bare --public cirros
查看镜像
openstack image list查看镜像本地文件
ll /var/lib/glance/images/Placement
The placement service enables other projects to track their own resources. Those projects can register/delete their own resources to/from placement via the placement HTTP API.
创建和配置数据库
mysql -u root -p
CREATE DATABASE placement;
授予权限
GRANT ALL PRIVILEGES ON placement.* TO 'placement'@'localhost' IDENTIFIED BY 'Abc-1234';
GRANT ALL PRIVILEGES ON placement.* TO 'placement'@'%' IDENTIFIED BY 'Abc-1234';
配置生效
flush privileges;创建用户和添加到项目中,此处配置密码Abc-1234
source admin-openrc
openstack user create --domain default --password-prompt placement
openstack role add --project service --user placement admin
创建服务实体
openstack service create --name placement --description "Placement API" placement创建placement API服务访问端点
openstack endpoint create --region RegionOne placement public http://ctl01:8778
openstack endpoint create --region RegionOne placement internal http://ctl01:8778
openstack endpoint create --region RegionOne placement admin http://ctl01:8778
安装placement软件包
yum install openstack-placement-api备份和修改配置
cp /etc/placement/placement.conf /etc/placement/placement.conf.bak
grep -Ev '^$|#' /etc/placement/placement.conf.bak > /etc/placement/placement.conf
openstack-config --set /etc/placement/placement.conf placement_database connection mysql+pymysql://placement:Abc-1234@ctl01/placement
openstack-config --set /etc/placement/placement.conf api auth_strategy keystone
openstack-config --set /etc/placement/placement.conf keystone_authtoken auth_url  http://ctl01:5000/v3
openstack-config --set /etc/placement/placement.conf keystone_authtoken memcached_servers ctl01:11211
openstack-config --set /etc/placement/placement.conf keystone_authtoken auth_type password
openstack-config --set /etc/placement/placement.conf keystone_authtoken project_domain_name Default
openstack-config --set /etc/placement/placement.conf keystone_authtoken user_domain_name Default
openstack-config --set /etc/placement/placement.conf keystone_authtoken project_name service
openstack-config --set /etc/placement/placement.conf keystone_authtoken username placement
openstack-config --set /etc/placement/placement.conf keystone_authtoken password Abc-1234
填充placement数据库
[root@ctl01 ~]# su -s /bin/sh -c "placement-manage db sync" placement
/usr/lib/python2.7/site-packages/pymysql/cursors.py:170: Warning: (1280, u"Name 'alembic_version_pkc' ignored for PRIMARY key.")
  result = self._query(query)
报错处理,再执行一次
[root@ctl01 ~]# su -s /bin/sh -c "placement-manage db sync" placement
修改placement的apache配置文件,官方文档没有提到,如果不修改,计算服务检查时将会报错
#启用placement API访问,在16行下增加下列配置段
vi /etc/httpd/conf.d/00-placement-api.conf
...
#SSLCertificateKeyFile
#SSLCertificateKeyFile ...
<Directory /usr/bin>
<IfVersion >= 2.4>
Require all granted
</IfVersion>
<IfVersion < 2.4>
Order allow,deny
Allow from all
</IfVersion>
</Directory>
...
重启apache服务验证
systemctl restart httpd.service
systemctl status httpd.service
netstat -lntup|grep 8778
curl测试返回json
[root@ctl01 ~]# curl http://ctl01:8778
{"versions": [{"status": "CURRENT", "min_version": "1.0", "max_version": "1.36", "id": "v1.0", "links": [{"href": "", "rel": "self"}]}]}
验证检查健康状态
placement-status upgrade checkNova
控制节点
创建nova_api,nova和nova_cell0数据库并授权
CREATE DATABASE nova_api;
CREATE DATABASE nova;
CREATE DATABASE nova_cell0;
GRANT ALL PRIVILEGES ON nova_api.* TO 'nova'@'localhost' IDENTIFIED BY 'Abc-1234';
GRANT ALL PRIVILEGES ON nova_api.* TO 'nova'@'%' IDENTIFIED BY 'Abc-1234';
GRANT ALL PRIVILEGES ON nova.* TO 'nova'@'localhost' IDENTIFIED BY 'Abc-1234';
GRANT ALL PRIVILEGES ON nova.* TO 'nova'@'%' IDENTIFIED BY 'Abc-1234';
GRANT ALL PRIVILEGES ON nova_cell0.* TO 'nova'@'localhost' IDENTIFIED BY 'Abc-1234';
GRANT ALL PRIVILEGES ON nova_cell0.* TO 'nova'@'%' IDENTIFIED BY 'Abc-1234';
flush privileges;
创建和配置nova账户
source admin-openrc
openstack user create --domain default --password Abc-1234 nova
向nova用户添加admin角色
openstack role add --project service --user nova admin创建nova服务实体
openstack service create --name nova --description "OpenStack Compute" compute创建Compute API服务端点
openstack endpoint create --region RegionOne compute public http://ctl01:8774/v2.1
openstack endpoint create --region RegionOne compute internal http://ctl01:8774/v2.1
openstack endpoint create --region RegionOne compute admin http://ctl01:8774/v2.1
安装Nova相关软件包
yum install openstack-nova-api openstack-nova-conductor openstack-nova-novncproxy openstack-nova-scheduler备份和编辑nova配置文件/etc/nova/nova.conf
cp -a /etc/nova/nova.conf{,.bak}
grep -Ev '^$|#' /etc/nova/nova.conf.bak > /etc/nova/nova.conf

# In the `[vnc]` section, configure the VNC proxy to use the management interface IP address of the controller node
my_ip=10.191.101.128
openstack-config --set /etc/nova/nova.conf DEFAULT enabled_apis  osapi_compute,metadata
openstack-config --set /etc/nova/nova.conf DEFAULT my_ip "$my_ip"
openstack-config --set /etc/nova/nova.conf DEFAULT use_neutron  true
openstack-config --set /etc/nova/nova.conf DEFAULT firewall_driver  nova.virt.firewall.NoopFirewallDriver
openstack-config --set /etc/nova/nova.conf DEFAULT transport_url  rabbit://openstack:Abc-1234@ctl01
openstack-config --set /etc/nova/nova.conf api_database connection  mysql+pymysql://nova:Abc-1234@ctl01/nova_api
openstack-config --set /etc/nova/nova.conf database connection  mysql+pymysql://nova:Abc-1234@ctl01/nova
openstack-config --set /etc/nova/nova.conf placement_database connection  mysql+pymysql://placement:Abc-1234@ctl01/placement
openstack-config --set /etc/nova/nova.conf api auth_strategy  keystone
openstack-config --set /etc/nova/nova.conf keystone_authtoken auth_url  http://ctl01:5000/v3
openstack-config --set /etc/nova/nova.conf keystone_authtoken memcached_servers  ctl01:11211
openstack-config --set /etc/nova/nova.conf keystone_authtoken auth_type  password
openstack-config --set /etc/nova/nova.conf keystone_authtoken project_domain_name  Default
openstack-config --set /etc/nova/nova.conf keystone_authtoken user_domain_name  Default
openstack-config --set /etc/nova/nova.conf keystone_authtoken project_name  service
openstack-config --set /etc/nova/nova.conf keystone_authtoken username  nova
openstack-config --set /etc/nova/nova.conf keystone_authtoken password  Abc-1234
openstack-config --set /etc/nova/nova.conf vnc enabled  true
openstack-config --set /etc/nova/nova.conf vnc server_listen  '$my_ip'
openstack-config --set /etc/nova/nova.conf vnc server_proxyclient_address  '$my_ip'
openstack-config --set /etc/nova/nova.conf glance api_servers  http://ctl01:9292
openstack-config --set /etc/nova/nova.conf oslo_concurrency lock_path  /var/lib/nova/tmp
openstack-config --set /etc/nova/nova.conf placement region_name  RegionOne
openstack-config --set /etc/nova/nova.conf placement project_domain_name  Default
openstack-config --set /etc/nova/nova.conf placement project_name  service
openstack-config --set /etc/nova/nova.conf placement auth_type  password
openstack-config --set /etc/nova/nova.conf placement user_domain_name  Default
openstack-config --set /etc/nova/nova.conf placement auth_url  http://ctl01:5000/v3
openstack-config --set /etc/nova/nova.conf placement username  placement
openstack-config --set /etc/nova/nova.conf placement password  Abc-1234
填充nova-api数据库
su -s /bin/sh -c "nova-manage api_db sync" nova
su -s /bin/sh -c "nova-manage cell_v2 map_cell0" nova
su -s /bin/sh -c "nova-manage cell_v2 create_cell --name=cell1 --verbose" nova
su -s /bin/sh -c "nova-manage db sync" nova
/usr/lib/python2.7/site-packages/pymysql/cursors.py:170: Warning: (1831, u'Duplicate index `block_device_mapping_instance_uuid_virtual_name_device_name_idx`. This is deprecated and will be disallowed in a future release')
  result = self._query(query)
/usr/lib/python2.7/site-packages/pymysql/cursors.py:170: Warning: (1831, u'Duplicate index `uniq_instances0uuid`. This is deprecated and will be disallowed in a future release')
  result = self._query(query)
报错处理,再执行一次
su -s /bin/sh -c "nova-manage db sync" nova验证nova cell0和cell1是否正确注册
su -s /bin/sh -c "nova-manage cell_v2 list_cells" nova配置开机启动和启动服务
systemctl enable \
openstack-nova-api.service \
openstack-nova-scheduler.service \
openstack-nova-conductor.service \
openstack-nova-novncproxy.service

systemctl restart \
openstack-nova-api.service \
openstack-nova-scheduler.service \
openstack-nova-conductor.service \
openstack-nova-novncproxy.service
检查运行状态
systemctl status \
openstack-nova-api.service \
openstack-nova-scheduler.service \
openstack-nova-conductor.service \
openstack-nova-novncproxy.service
检查nova服务状态
netstat -tnlup|egrep '8774|8775'
curl http://ctl01:8774
计算节点
安装软件包
yum install openstack-nova-compute
yum install openstack-utils
备份和编辑nova配置文件
cp /etc/nova/nova.conf{,.bak}
grep -Ev '^$|#' /etc/nova/nova.conf.bak > /etc/nova/nova.conf

my_ip=10.191.101.129
openstack-config --set  /etc/nova/nova.conf DEFAULT enabled_apis  osapi_compute,metadata
openstack-config --set  /etc/nova/nova.conf DEFAULT transport_url  rabbit://openstack:Abc-1234@ctl01
openstack-config --set  /etc/nova/nova.conf DEFAULT my_ip "$my_ip"
openstack-config --set  /etc/nova/nova.conf DEFAULT use_neutron  true
openstack-config --set  /etc/nova/nova.conf DEFAULT firewall_driver  nova.virt.firewall.NoopFirewallDriver
openstack-config --set  /etc/nova/nova.conf api auth_strategy  keystone
openstack-config --set  /etc/nova/nova.conf keystone_authtoken auth_url  http://ctl01:5000/v3
openstack-config --set  /etc/nova/nova.conf keystone_authtoken memcached_servers  ctl01:11211
openstack-config --set  /etc/nova/nova.conf keystone_authtoken auth_type  password
openstack-config --set  /etc/nova/nova.conf keystone_authtoken project_domain_name  Default
openstack-config --set  /etc/nova/nova.conf keystone_authtoken user_domain_name  Default
openstack-config --set  /etc/nova/nova.conf keystone_authtoken project_name  service
openstack-config --set  /etc/nova/nova.conf keystone_authtoken username  nova
openstack-config --set  /etc/nova/nova.conf keystone_authtoken password  Abc-1234
openstack-config --set  /etc/nova/nova.conf vnc enabled  true
openstack-config --set  /etc/nova/nova.conf vnc server_listen  0.0.0.0
openstack-config --set  /etc/nova/nova.conf vnc server_proxyclient_address '$my_ip'
openstack-config --set  /etc/nova/nova.conf vnc novncproxy_base_url http://ctl01:6080/vnc_auto.html
openstack-config --set  /etc/nova/nova.conf glance api_servers  http://ctl01:9292
openstack-config --set  /etc/nova/nova.conf oslo_concurrency lock_path  /var/lib/nova/tmp
openstack-config --set  /etc/nova/nova.conf placement region_name  RegionOne
openstack-config --set  /etc/nova/nova.conf placement project_domain_name  Default
openstack-config --set  /etc/nova/nova.conf placement project_name  service
openstack-config --set  /etc/nova/nova.conf placement auth_type  password
openstack-config --set  /etc/nova/nova.conf placement user_domain_name  Default
openstack-config --set  /etc/nova/nova.conf placement auth_url  http://ctl01:5000/v3
openstack-config --set  /etc/nova/nova.conf placement username  placement
openstack-config --set  /etc/nova/nova.conf placement password  Abc-1234
确定计算节点是否支持虚拟机硬件加速
egrep -c '(vmx|svm)' /proc/cpuinfo
# 如果此命令返回值不是0,则计算节点支持硬件加速,不需要加入下面的配置。
# 如果此命令返回值是0,则计算节点不支持硬件加速,并且必须配置libvirt为使用QEMU而不是KVM,需要编辑/etc/nova/nova.conf 配置文件中的[libvirt]部分:
openstack-config --set  /etc/nova/nova.conf libvirt virt_type  qemu
启动计算节点的nova服务及其相关服务,并设置开机自启
# 如果nova-compute服务无法启动,请检查 /var/log/nova/nova-compute.log,该错误消息可能表明控制器节点上的防火墙阻止访问端口5672,将防火墙配置为打开控制器节点上的端口5672并重新启动计算节点上的服务
systemctl restart libvirtd.service openstack-nova-compute.service
systemctl enable libvirtd.service openstack-nova-compute.service
在控制节点(ctl01)上验证计算节点
openstack compute service list --service nova-compute控制节点上发现计算主机
# 添加每台新的计算节点时,必须在控制器节点上运行以下命令以注册这些新的计算节点
su -s /bin/sh -c "nova-manage cell_v2 discover_hosts --verbose" nova
# 也可以设置适当的发现时间间隔来添加新的计算节点
openstack-config --set  /etc/nova/nova.conf scheduler discover_hosts_in_cells_interval 600
systemctl restart openstack-nova-api.service
在控制节点上验证nova服务
列出服务组件以验证每个进程的成功启动和注册情况
openstack compute service list列出身份服务中的API端点以验证与身份服务的连接
openstack catalog list列出镜像服务中的镜像以验证与镜像服务的连接性
openstack image list检查Cells和placement API是否正常运行
nova-status upgrade checkWindows计算节点
Neutron
控制节点
创建neutron数据库
mysql -uroot -pAbc-1234
CREATE DATABASE neutron;
GRANT ALL PRIVILEGES ON neutron.* TO 'neutron'@'localhost' IDENTIFIED BY 'Abc-1234';
GRANT ALL PRIVILEGES ON neutron.* TO 'neutron'@'%' IDENTIFIED BY 'Abc-1234';
flush privileges;
创建neutron用户
source admin-openrc
openstack user create --domain default --password Abc-1234 neutron
向neutron用户添加admin角色
openstack role add --project service --user neutron admin创建neutron服务实体
openstack service create --name neutron --description "OpenStack Networking" network创建neutron服务端点
openstack endpoint create --region RegionOne network public http://ctl01:9696
openstack endpoint create --region RegionOne network internal http://ctl01:9696
openstack endpoint create --region RegionOne network admin http://ctl01:9696
Provider Networks
安装neutron软件包
yum install openstack-neutron openstack-neutron-ml2 openstack-neutron-linuxbridge ebtables
# openstack-neutron:neutron-server的包
# openstack-neutron-ml2:ML2 plugin的包
# openstack-neutron-linuxbridge:linux bridge network provider相关的包
# ebtables:防火墙相关的包
编辑neutron服务配置文件/etc/neutron/neutron.conf
# 配置二层网络
cp -a /etc/neutron/neutron.conf{,.bak}
grep -Ev '^$|#' /etc/neutron/neutron.conf.bak > /etc/neutron/neutron.conf

openstack-config --set  /etc/neutron/neutron.conf database connection  mysql+pymysql://neutron:Abc-1234@ctl01/neutron
openstack-config --set  /etc/neutron/neutron.conf DEFAULT core_plugin ml2
openstack-config --set  /etc/neutron/neutron.conf DEFAULT service_plugins router
openstack-config --set  /etc/neutron/neutron.conf DEFAULT allow_overlapping_ips true
openstack-config --set  /etc/neutron/neutron.conf DEFAULT transport_url  rabbit://openstack:Abc-1234@ctl01
openstack-config --set  /etc/neutron/neutron.conf DEFAULT auth_strategy  keystone
openstack-config --set  /etc/neutron/neutron.conf DEFAULT notify_nova_on_port_status_changes  true
openstack-config --set  /etc/neutron/neutron.conf DEFAULT notify_nova_on_port_data_changes  true
openstack-config --set  /etc/neutron/neutron.conf keystone_authtoken www_authenticate_uri  http://ctl01:5000
openstack-config --set  /etc/neutron/neutron.conf keystone_authtoken auth_url  http://ctl01:5000
openstack-config --set  /etc/neutron/neutron.conf keystone_authtoken memcached_servers  ctl01:11211
openstack-config --set  /etc/neutron/neutron.conf keystone_authtoken auth_type  password
openstack-config --set  /etc/neutron/neutron.conf keystone_authtoken project_domain_name  default
openstack-config --set  /etc/neutron/neutron.conf keystone_authtoken user_domain_name  default
openstack-config --set  /etc/neutron/neutron.conf keystone_authtoken project_name  service
openstack-config --set  /etc/neutron/neutron.conf keystone_authtoken username  neutron
openstack-config --set  /etc/neutron/neutron.conf keystone_authtoken password  Abc-1234
openstack-config --set  /etc/neutron/neutron.conf oslo_concurrency lock_path  /var/lib/neutron/tmp
openstack-config --set  /etc/neutron/neutron.conf nova  auth_url http://ctl01:5000
openstack-config --set  /etc/neutron/neutron.conf nova  auth_type password
openstack-config --set  /etc/neutron/neutron.conf nova  project_domain_name default
openstack-config --set  /etc/neutron/neutron.conf nova  user_domain_name default
openstack-config --set  /etc/neutron/neutron.conf nova  region_name RegionOne
openstack-config --set  /etc/neutron/neutron.conf nova  project_name service
openstack-config --set  /etc/neutron/neutron.conf nova  username nova
openstack-config --set  /etc/neutron/neutron.conf nova  password Abc-1234
ML2 plugin的配置文件ml2_conf.ini
cp -a /etc/neutron/plugins/ml2/ml2_conf.ini{,.bak}
grep -Ev '^$|#' /etc/neutron/plugins/ml2/ml2_conf.ini.bak > /etc/neutron/plugins/ml2/ml2_conf.ini

openstack-config --set /etc/neutron/plugins/ml2/ml2_conf.ini ml2 type_drivers  flat,vlan,vxlan
openstack-config --set /etc/neutron/plugins/ml2/ml2_conf.ini ml2 tenant_network_types vxlan
openstack-config --set /etc/neutron/plugins/ml2/ml2_conf.ini ml2 mechanism_drivers  linuxbridge,l2population
openstack-config --set /etc/neutron/plugins/ml2/ml2_conf.ini ml2 extension_drivers  port_security
openstack-config --set /etc/neutron/plugins/ml2/ml2_conf.ini ml2_type_flat flat_networks  provider
openstack-config --set /etc/neutron/plugins/ml2/ml2_conf.ini linux_bridge physical_interface_mappings provider:ens33
openstack-config --set /etc/neutron/plugins/ml2/ml2_conf.ini ml2_type_vxlan vni_ranges 1:1000
openstack-config --set /etc/neutron/plugins/ml2/ml2_conf.ini securitygroup enable_ipset  true
配置linux网桥代理
Linux网桥代理为实例构建第2层(桥接和交换)虚拟网络基础结构并处理安全组
修改配置文件/etc/neutron/plugins/ml2/linuxbridge_agent.ini
# 官方配置文档中,
# PROVIDER_INTERFACE_NAME指的是eth0网卡,就是连接外部网络的那块网卡
# OVERLAY_INTERFACE_IP_ADDRESS指的是控制节点访问外网的IP地址

cp -a /etc/neutron/plugins/ml2/linuxbridge_agent.ini{,.bak}
grep -Ev '^$|#' /etc/neutron/plugins/ml2/linuxbridge_agent.ini.bak > /etc/neutron/plugins/ml2/linuxbridge_agent.ini
openstack-config --set /etc/neutron/plugins/ml2/linuxbridge_agent.ini linux_bridge physical_interface_mappings  provider:ens33
openstack-config --set /etc/neutron/plugins/ml2/linuxbridge_agent.ini vxlan enable_vxlan  true
openstack-config --set /etc/neutron/plugins/ml2/linuxbridge_agent.ini vxlan local_ip 10.191.101.128
openstack-config --set /etc/neutron/plugins/ml2/linuxbridge_agent.ini vxlan l2_population true
openstack-config --set /etc/neutron/plugins/ml2/linuxbridge_agent.ini securitygroup enable_security_group  true
openstack-config --set /etc/neutron/plugins/ml2/linuxbridge_agent.ini securitygroup firewall_driver  neutron.agent.linux.iptables_firewall.IptablesFirewallDriver

# 修改linux内核参数设置为1
echo 'net.bridge.bridge-nf-call-iptables=1' >>/etc/sysctl.conf
echo 'net.bridge.bridge-nf-call-ip6tables=1'  >>/etc/sysctl.conf

# 启用网络桥接器支持,加载 br_netfilter 内核模块
modprobe br_netfilter
sysctl -p
配置第3层 l3代理为自助式虚拟网络提供路由和NAT服务
# 配置三层网络
cp -a /etc/neutron/l3_agent.ini{,.bak}
grep -Ev '^$|#' /etc/neutron/l3_agent.ini.bak > /etc/neutron/l3_agent.ini

openstack-config --set /etc/neutron/l3_agent.ini DEFAULT interface_driver linuxbridge
配置DHCP代理,DHCP代理为虚拟网络提供DHCP服务
# 修改配置文件/etc/neutron/dhcp_agent.ini
cp -a /etc/neutron/dhcp_agent.ini{,.bak}
grep -Ev '^$|#' /etc/neutron/dhcp_agent.ini.bak > /etc/neutron/dhcp_agent.ini

openstack-config --set  /etc/neutron/dhcp_agent.ini DEFAULT interface_driver linuxbridge
openstack-config --set  /etc/neutron/dhcp_agent.ini DEFAULT dhcp_driver neutron.agent.linux.dhcp.Dnsmasq
openstack-config --set  /etc/neutron/dhcp_agent.ini DEFAULT enable_isolated_metadata true
配置元数据代理
# 元数据代理提供配置信息,例如实例的凭据
# 修改配置文件/etc/neutron/metadata_agent.ini ,并为元数据设置密码METADATA_SECRET

cp -a /etc/neutron/metadata_agent.ini{,.bak}
grep -Ev '^$|#' /etc/neutron/metadata_agent.ini.bak > /etc/neutron/metadata_agent.ini

openstack-config --set  /etc/neutron/metadata_agent.ini DEFAULT nova_metadata_host  controller
openstack-config --set  /etc/neutron/metadata_agent.ini DEFAULT metadata_proxy_shared_secret  Abc-1234
在控制节点上配置Nova服务与网络服务进行交互
# 修改配置文件/etc/nova/nova.conf
openstack-config --set  /etc/nova/nova.conf neutron url  http://ctl01:9696
openstack-config --set  /etc/nova/nova.conf neutron auth_url  http://ctl01:5000
openstack-config --set  /etc/nova/nova.conf neutron auth_type  password
openstack-config --set  /etc/nova/nova.conf neutron project_domain_name  default
openstack-config --set  /etc/nova/nova.conf neutron user_domain_name  default
openstack-config --set  /etc/nova/nova.conf neutron region_name  RegionOne
openstack-config --set  /etc/nova/nova.conf neutron project_name  service
openstack-config --set  /etc/nova/nova.conf neutron username  neutron
openstack-config --set  /etc/nova/nova.conf neutron password  Abc-1234
openstack-config --set  /etc/nova/nova.conf neutron service_metadata_proxy  true
openstack-config --set  /etc/nova/nova.conf neutron metadata_proxy_shared_secret  Abc-1234
创建ml2的软连接 文件指向ML2插件配置的软链接
ln -s /etc/neutron/plugins/ml2/ml2_conf.ini /etc/neutron/plugin.ini填充数据库
su -s /bin/sh -c "neutron-db-manage --config-file /etc/neutron/neutron.conf \
--config-file /etc/neutron/plugins/ml2/ml2_conf.ini upgrade head" neutron
重新启动nova API计算服务
systemctl restart openstack-nova-api.service启动neutron服务和配置开机启动
systemctl enable neutron-server.service neutron-linuxbridge-agent.service neutron-dhcp-agent.service neutron-metadata-agent.service
systemctl restart neutron-server.service neutron-linuxbridge-agent.service neutron-dhcp-agent.service neutron-metadata-agent.service
因配置了第3层l3网络服务 需要启动第三层服务
systemctl enable neutron-l3-agent.service
systemctl restart neutron-l3-agent.service
计算节点安装neutron服务
安装组件
yum install openstack-neutron-linuxbridge ebtables ipset修改neutron主配置文件/etc/neutron/neutron.conf
cp -a /etc/neutron/neutron.conf{,.bak}
grep -Ev '^$|#' /etc/neutron/neutron.conf.bak > /etc/neutron/neutron.conf

openstack-config --set  /etc/neutron/neutron.conf DEFAULT transport_url rabbit://openstack:Abc-1234@ctl01
openstack-config --set  /etc/neutron/neutron.conf DEFAULT auth_strategy keystone
openstack-config --set  /etc/neutron/neutron.conf keystone_authtoken www_authenticate_uri http://ctl01:5000
openstack-config --set  /etc/neutron/neutron.conf keystone_authtoken auth_url http://ctl01:5000
openstack-config --set  /etc/neutron/neutron.conf keystone_authtoken memcached_servers ctl01:11211
openstack-config --set  /etc/neutron/neutron.conf keystone_authtoken auth_type password
openstack-config --set  /etc/neutron/neutron.conf keystone_authtoken project_domain_name default
openstack-config --set  /etc/neutron/neutron.conf keystone_authtoken user_domain_name default
openstack-config --set  /etc/neutron/neutron.conf keystone_authtoken project_name service
openstack-config --set  /etc/neutron/neutron.conf keystone_authtoken username neutron
openstack-config --set  /etc/neutron/neutron.conf keystone_authtoken password Abc-1234
openstack-config --set  /etc/neutron/neutron.conf oslo_concurrency lock_path /var/lib/neutron/tmp
配置Linux网桥代理
cp -a /etc/neutron/plugins/ml2/linuxbridge_agent.ini{,.bak}
grep -Ev '^$|#' /etc/neutron/plugins/ml2/linuxbridge_agent.ini.bak > /etc/neutron/plugins/ml2/linuxbridge_agent.ini

openstack-config --set /etc/neutron/plugins/ml2/linuxbridge_agent.ini linux_bridge physical_interface_mappings  provider:ens33
openstack-config --set /etc/neutron/plugins/ml2/linuxbridge_agent.ini vxlan enable_vxlan  true
openstack-config --set /etc/neutron/plugins/ml2/linuxbridge_agent.ini vxlan local_ip 10.191.101.129
openstack-config --set /etc/neutron/plugins/ml2/linuxbridge_agent.ini vxlan l2_population true
openstack-config --set /etc/neutron/plugins/ml2/linuxbridge_agent.ini securitygroup enable_security_group  true
openstack-config --set /etc/neutron/plugins/ml2/linuxbridge_agent.ini securitygroup firewall_driver  neutron.agent.linux.iptables_firewall.IptablesFirewallDriver
修改linux系统内核网桥参数为1
echo 'net.bridge.bridge-nf-call-iptables=1' >>/etc/sysctl.conf
echo 'net.bridge.bridge-nf-call-ip6tables=1'  >>/etc/sysctl.conf
modprobe br_netfilter
sysctl -p
配置计算节点上Nova服务使用网络服务
# 修改nova配置文件/etc/nova/nova.conf,添加neutron模块配置
openstack-config --set  /etc/nova/nova.conf neutron auth_url http://ctl01:5000
openstack-config --set  /etc/nova/nova.conf neutron auth_type password
openstack-config --set  /etc/nova/nova.conf neutron project_domain_name default
openstack-config --set  /etc/nova/nova.conf neutron user_domain_name default
openstack-config --set  /etc/nova/nova.conf neutron region_name RegionOne
openstack-config --set  /etc/nova/nova.conf neutron project_name service
openstack-config --set  /etc/nova/nova.conf neutron username neutron
openstack-config --set  /etc/nova/nova.conf neutron password Abc-1234
重新启动计算节点上的Nova服务
systemctl restart openstack-nova-compute.service启动neutron网桥代理服务 设置开机自启动
systemctl enable neutron-linuxbridge-agent.service
systemctl restart neutron-linuxbridge-agent.service
回到控制节点验证Neutron网络服务
# 列出已加载的扩展,以验证该neutron-server过程是否成功启动
source admin-openrc
openstack extension list --network

# 列出代理商以验证成功
openstack network agent list
安装neutron网络服务节点
网络配置按照官网文档的租户自助网络
配置系统参数
echo 'net.ipv4.ip_forward = 1' >>/etc/sysctl.conf
sysctl -p
安装客户端
yum install python-openstackclient安装组件
yum install openstack-neutron openstack-neutron-ml2 openstack-neutron-linuxbridge ebtables openstack-utils编辑neutron服务配置文件/etc/neutron/neutron.conf
# 配置二层网络
cp -a /etc/neutron/neutron.conf{,.bak}
grep -Ev '^$|#' /etc/neutron/neutron.conf.bak > /etc/neutron/neutron.conf

openstack-config --set  /etc/neutron/neutron.conf database connection  mysql+pymysql://neutron:Abc-1234@ctl01/neutron
openstack-config --set  /etc/neutron/neutron.conf DEFAULT core_plugin ml2
openstack-config --set  /etc/neutron/neutron.conf DEFAULT service_plugins router
openstack-config --set  /etc/neutron/neutron.conf DEFAULT allow_overlapping_ips true
openstack-config --set  /etc/neutron/neutron.conf DEFAULT transport_url  rabbit://openstack:Abc-1234@ctl01
openstack-config --set  /etc/neutron/neutron.conf DEFAULT auth_strategy  keystone
openstack-config --set  /etc/neutron/neutron.conf DEFAULT notify_nova_on_port_status_changes  true
openstack-config --set  /etc/neutron/neutron.conf DEFAULT notify_nova_on_port_data_changes  true
openstack-config --set  /etc/neutron/neutron.conf keystone_authtoken www_authenticate_uri  http://ctl01:5000
openstack-config --set  /etc/neutron/neutron.conf keystone_authtoken auth_url  http://ctl01:5000
openstack-config --set  /etc/neutron/neutron.conf keystone_authtoken memcached_servers  ctl01:11211
openstack-config --set  /etc/neutron/neutron.conf keystone_authtoken auth_type  password
openstack-config --set  /etc/neutron/neutron.conf keystone_authtoken project_domain_name  default
openstack-config --set  /etc/neutron/neutron.conf keystone_authtoken user_domain_name  default
openstack-config --set  /etc/neutron/neutron.conf keystone_authtoken project_name  service
openstack-config --set  /etc/neutron/neutron.conf keystone_authtoken username  neutron
openstack-config --set  /etc/neutron/neutron.conf keystone_authtoken password  Abc-1234
openstack-config --set  /etc/neutron/neutron.conf oslo_concurrency lock_path  /var/lib/neutron/tmp
openstack-config --set  /etc/neutron/neutron.conf nova  auth_url http://ctl01:5000
openstack-config --set  /etc/neutron/neutron.conf nova  auth_type password
openstack-config --set  /etc/neutron/neutron.conf nova  project_domain_name default
openstack-config --set  /etc/neutron/neutron.conf nova  user_domain_name default
openstack-config --set  /etc/neutron/neutron.conf nova  region_name RegionOne
openstack-config --set  /etc/neutron/neutron.conf nova  project_name service
openstack-config --set  /etc/neutron/neutron.conf nova  username nova
openstack-config --set  /etc/neutron/neutron.conf nova  password Abc-1234
ML2 plugin的配置文件ml2_conf.ini
cp -a /etc/neutron/plugins/ml2/ml2_conf.ini{,.bak}
grep -Ev '^$|#' /etc/neutron/plugins/ml2/ml2_conf.ini.bak > /etc/neutron/plugins/ml2/ml2_conf.ini

openstack-config --set /etc/neutron/plugins/ml2/ml2_conf.ini ml2 type_drivers  flat,vlan,vxlan
openstack-config --set /etc/neutron/plugins/ml2/ml2_conf.ini ml2 tenant_network_types vxlan
openstack-config --set /etc/neutron/plugins/ml2/ml2_conf.ini ml2 mechanism_drivers  linuxbridge,l2population
openstack-config --set /etc/neutron/plugins/ml2/ml2_conf.ini ml2 extension_drivers  port_security
openstack-config --set /etc/neutron/plugins/ml2/ml2_conf.ini ml2_type_flat flat_networks  provider
openstack-config --set /etc/neutron/plugins/ml2/ml2_conf.ini ml2_type_vxlan vni_ranges 1:1000
openstack-config --set /etc/neutron/plugins/ml2/ml2_conf.ini securitygroup enable_ipset  true
配置Linux网桥代理
# Linux网桥代理为实例构建第2层(桥接和交换)虚拟网络基础结构并处理安全组
# 修改配置文件/etc/neutron/plugins/ml2/linuxbridge_agent.ini
# 官网配置文档中:
# PROVIDER_INTERFACE_NAME指的是eth0网卡,就是连接外部网络的那块网卡
# OVERLAY_INTERFACE_IP_ADDRESS指的是控制节点访问外网的IP地址

cp -a /etc/neutron/plugins/ml2/linuxbridge_agent.ini{,.bak}
grep -Ev '^$|#' /etc/neutron/plugins/ml2/linuxbridge_agent.ini.bak > /etc/neutron/plugins/ml2/linuxbridge_agent.ini

openstack-config --set /etc/neutron/plugins/ml2/linuxbridge_agent.ini linux_bridge physical_interface_mappings  provider:ens33
openstack-config --set /etc/neutron/plugins/ml2/linuxbridge_agent.ini vxlan enable_vxlan  true
openstack-config --set /etc/neutron/plugins/ml2/linuxbridge_agent.ini vxlan local_ip 10.191.101.130
openstack-config --set /etc/neutron/plugins/ml2/linuxbridge_agent.ini vxlan l2_population true
openstack-config --set /etc/neutron/plugins/ml2/linuxbridge_agent.ini securitygroup enable_security_group  true
openstack-config --set /etc/neutron/plugins/ml2/linuxbridge_agent.ini securitygroup firewall_driver  neutron.agent.linux.iptables_firewall.IptablesFirewallDriver

# 修改linux内核参数设置为1
echo 'net.bridge.bridge-nf-call-iptables=1' >>/etc/sysctl.conf
echo 'net.bridge.bridge-nf-call-ip6tables=1'  >>/etc/sysctl.conf

# 启用网络桥接器支持,加载 br_netfilter 内核模块
modprobe br_netfilter
sysctl -p
配置第3层 l3代理为自助式虚拟网络提供路由和NAT服务
# 配置三层网络
cp -a /etc/neutron/l3_agent.ini{,.bak}
grep -Ev '^$|#' /etc/neutron/l3_agent.ini.bak > /etc/neutron/l3_agent.ini

openstack-config --set /etc/neutron/l3_agent.ini DEFAULT interface_driver linuxbridge
配置DHCP代理,DHCP代理为虚拟网络提供DHCP服务
# 修改配置文件/etc/neutron/dhcp_agent.ini
cp -a /etc/neutron/dhcp_agent.ini{,.bak}
grep -Ev '^$|#' /etc/neutron/dhcp_agent.ini.bak > /etc/neutron/dhcp_agent.ini

openstack-config --set  /etc/neutron/dhcp_agent.ini DEFAULT interface_driver linuxbridge
openstack-config --set  /etc/neutron/dhcp_agent.ini DEFAULT dhcp_driver neutron.agent.linux.dhcp.Dnsmasq
openstack-config --set  /etc/neutron/dhcp_agent.ini DEFAULT enable_isolated_metadata true
配置元数据代理
# 元数据代理提供配置信息,例如实例的凭据
# 修改配置文件/etc/neutron/metadata_agent.ini ,并为元数据设置密码METADATA_SECRET

cp -a /etc/neutron/metadata_agent.ini{,.bak}
grep -Ev '^$|#' /etc/neutron/metadata_agent.ini.bak > /etc/neutron/metadata_agent.ini

openstack-config --set  /etc/neutron/metadata_agent.ini DEFAULT nova_metadata_host  controller
openstack-config --set  /etc/neutron/metadata_agent.ini DEFAULT metadata_proxy_shared_secret  Abc-1234
创建ml2的软连接 文件指向ML2插件配置的软链接
ln -s /etc/neutron/plugins/ml2/ml2_conf.ini /etc/neutron/plugin.ini填充数据库
su -s /bin/sh -c "neutron-db-manage --config-file /etc/neutron/neutron.conf --config-file /etc/neutron/plugins/ml2/ml2_conf.ini upgrade head" neutron在ctl01控制节点上配置nova服务与网络节点服务进行交互 如果是单独安装网络节点则添加以下操作,如果已经在配置计算节点的网络服务时,在控制节点的配置文件/etc/nova/nova.conf添加了neutron模块 ,则不用再次添加
openstack-config --set  /etc/nova/nova.conf neutron url  http://ctl01:9696  #此条官方文档未添加
openstack-config --set  /etc/nova/nova.conf neutron auth_url  http://ctl01:5000
openstack-config --set  /etc/nova/nova.conf neutron auth_type  password
openstack-config --set  /etc/nova/nova.conf neutron project_domain_name  default
openstack-config --set  /etc/nova/nova.conf neutron user_domain_name  default
openstack-config --set  /etc/nova/nova.conf neutron region_name  RegionOne
openstack-config --set  /etc/nova/nova.conf neutron project_name  service
openstack-config --set  /etc/nova/nova.conf neutron username  neutron
openstack-config --set  /etc/nova/nova.conf neutron password  Abc-1234
openstack-config --set  /etc/nova/nova.conf neutron service_metadata_proxy  true
openstack-config --set  /etc/nova/nova.conf neutron metadata_proxy_shared_secret  Abc-1234
# 在ctl01控制节点上重新启动nova API计算服务
systemctl restart openstack-nova-api.service
回到网络节点启动neutron服务和配置开机启动
systemctl enable neutron-server.service neutron-linuxbridge-agent.service neutron-dhcp-agent.service neutron-metadata-agent.service
systemctl restart neutron-server.service neutron-linuxbridge-agent.service neutron-dhcp-agent.service neutron-metadata-agent.service
因配置了第3层l3网络服务 需要启动第三层服务
systemctl enable neutron-l3-agent.service
systemctl restart neutron-l3-agent.service
可以到控制节点再次验证Neutron网络服务
# 列出已加载的扩展,以验证该neutron-server过程是否成功启动
openstack extension list --network
# 列出代理商以验证成功
openstack network agent list
Horizon
在控制节点上安装horizon
安装软件包
yum install openstack-dashboard改配置文件/etc/openstack-dashboard/local_settings
cp -a /etc/openstack-dashboard/local_settings{,.bak}
grep -Ev '^$|#' /etc/openstack-dashboard/local_settings.bak >/etc/openstack-dashboard/local_settings
在控制节点上配置仪表盘以使用 OpenStack 服务
OPENSTACK_HOST = "ctl01"允许所有主机访问仪表板
ALLOWED_HOSTS = ['*', ]配置 memcached 会话存储服务:
SESSION_ENGINE = 'django.contrib.sessions.backends.cache'
CACHES = {
    'default': {
         'BACKEND': 'django.core.cache.backends.memcached.MemcachedCache',
         'LOCATION': 'ctl01:11211',
    }
}
启用第3版认证API
OPENSTACK_KEYSTONE_URL = "http://%s:5000/v3" % OPENSTACK_HOST启用对域的支持
OPENSTACK_KEYSTONE_MULTIDOMAIN_SUPPORT = True配置API版本
OPENSTACK_API_VERSIONS = {
    "identity": 3,
    "image": 2,
    "volume": 2,
}
通过仪表盘创建用户时的默认域配置为 default
OPENSTACK_KEYSTONE_DEFAULT_DOMAIN = "default"通过仪表盘创建的用户默认角色配置为 user
OPENSTACK_KEYSTONE_DEFAULT_ROLE = "user"如果您选择网络参数1,禁用支持3层网络服务
OPENSTACK_NEUTRON_NETWORK = {
    ...
    'enable_router': False,
    'enable_quotas': False,
    'enable_distributed_router': False,
    'enable_ha_router': False,
    'enable_lb': False,
    'enable_firewall': False,
    'enable_vpn': False,
    'enable_fip_topology_check': False,
}
可以选择性地配置时区
TIME_ZONE = "Asia/Shanghai"全部配置说明
cat /etc/openstack-dashboard/local_settings

# 配置仪表盘在ctl01节点上使用OpenStack服务
OPENSTACK_HOST = "ctl01"

# 允许主机访问仪表板,接受所有主机,不安全不应在生产中使用
ALLOWED_HOSTS = ['*']
# ALLOWED_HOSTS = ['one.example.com', 'two.example.com']

# 配置memcached会话存储服务
SESSION_ENGINE = 'django.contrib.sessions.backends.cache'
CACHES = {
    'default': {
         'BACKEND': 'django.core.cache.backends.memcached.MemcachedCache',
         'LOCATION': 'ctl01:11211',
    }
}

# 启用身份API版本3
OPENSTACK_KEYSTONE_URL = "http://%s:5000/v3" % OPENSTACK_HOST

# 启用对域的支持
OPENSTACK_KEYSTONE_MULTIDOMAIN_SUPPORT = True

# 配置API版本
OPENSTACK_API_VERSIONS = {
    "identity": 3,
    "image": 2,
    "volume": 3,
}

# 配置Default为通过仪表板创建的用户的默认域
OPENSTACK_KEYSTONE_DEFAULT_DOMAIN = "Default"

# 配置user为通过仪表板创建的用户的默认角色
OPENSTACK_KEYSTONE_DEFAULT_ROLE = "user"

# 如果选择网络选项1,请禁用对第3层网络服务的支持,如果选择网络选项2,则可以打开
OPENSTACK_NEUTRON_NETWORK = {
# 自动分配的网络
    'enable_auto_allocated_network': False,

# Neutron分布式虚拟路由器(DVR)
    'enable_distributed_router': False,

# FIP拓扑检查
    'enable_fip_topology_check': False,

# 高可用路由器模式
    'enable_ha_router': False,

# 下面三个已过时,不用过多了解,官方文档配置中是关闭的
    'enable_lb': False,
    'enable_firewall': False,
    'enable_vpn': False,

# ipv6网络
    'enable_ipv6': True,

# Neutron配额功能
    'enable_quotas': True,

# rbac政策
    'enable_rbac_policy': True,

# 路由器的菜单和浮动IP功能,如果Neutron部署有三层功能的支持可以打开
    'enable_router': True,

# 默认的DNS名称服务器
    'default_dns_nameservers': [],

# 网络支持的提供者类型,在创建网络时,该列表中的网络类型可供选择
    'supported_provider_types': ['*'],

# 使用与提供网络ID范围,仅涉及到VLAN,GRE,和VXLAN网络类型
    'segmentation_id_range': {},

# 使用与提供网络类型
    'extra_provider_types': {},

# 支持的vnic类型,用于与端口绑定扩展
    # 'supported_vnic_types': ['*'],

# 物理网络
    # 'physical_networks': [],
}

# 配置时区为亚洲上海
TIME_ZONE = "Asia/Shanghai"
重建apache的dashboard配置文件
cd /usr/share/openstack-dashboard
python manage.py make_web_conf --apache > /etc/httpd/conf.d/openstack-dashboard.conf
重新启动节点上的apache服务和memcache服务
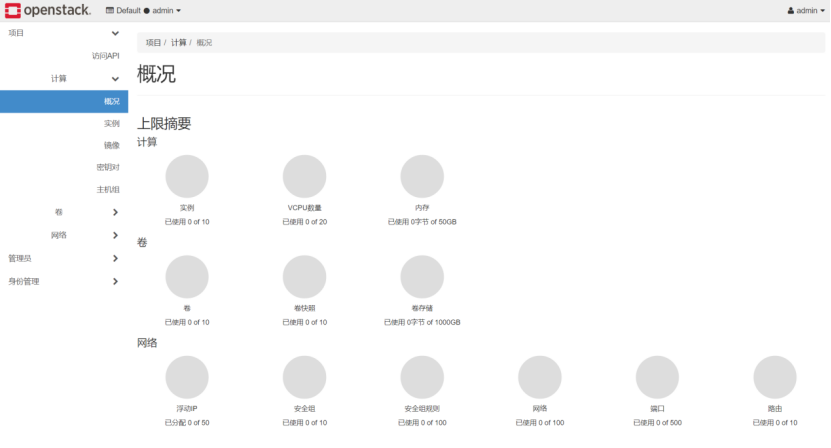
systemctl restart httpd.service memcached.service访问dashboard
http://10.191.101.128若不能正常访问,请操作以下步骤:建立策略文件(policy.json)的软链接,否则登录到dashboard将出现权限错误和显示混乱
ln -s /etc/openstack-dashboard /usr/share/openstack-dashboard/openstack_dashboard/conf
# /etc/httpd/conf.d/openstack-dashboard.conf 如果未包含,则添加以下行
WSGIApplicationGroup %{GLOBAL}
身份认证dashboard无法打开
vim /etc/httpd/conf.d/openstack-dashboard.conf

# 将原有的配置注释掉
#WSGIScriptAlias / /usr/share/openstack-dashboard/openstack_dashboard/wsgi.py
#Alias /static /usr/share/openstack-dashboard/static

# 添加以下配置
WSGIScriptAlias /dashboard /usr/share/openstack-dashboard/openstack_dashboard/wsgi/django.wsgi
Alias /dashboard/static /usr/share/openstack-dashboard/static
在local_settings底下新增根目录指向
vim /etc/openstack-dashboard/local_settings
WEBROOT = '/dashboard/'
编辑以下文件,找到WEBROOT = ’/’ 修改为WEBROOT = ‘/dashboard’
vim /usr/share/openstack-dashboard/openstack_dashboard/defaults.py
vim /usr/share/openstack-dashboard/openstack_dashboard/test/settings.py
vim /usr/share/openstack-dashboard/static/dashboard/js/xxxx.js
修改后重启服务即可
systemctl restart httpd.service memcached.serviceCinder
控制节点配置
在控制节点(ctl01:10.191.101.128)上配置
mysql -u root -p创建数据库并授权
CREATE DATABASE cinder;
GRANT ALL PRIVILEGES ON cinder.* TO 'cinder'@'localhost' IDENTIFIED BY 'Abc-1234';
GRANT ALL PRIVILEGES ON cinder.* TO 'cinder'@'%' IDENTIFIED BY 'Abc-1234';
flush privileges;
创建cinder用户
openstack user create --domain default --password Abc-1234 cinder赋予Cinder权限为admin
openstack role add --project service --user cinder admin创建 cinder服务实体
openstack service create --name cinderv2 --description "OpenStack Block Storage" volumev2
openstack service create --name cinderv3 --description "OpenStack Block Storage" volumev3
创建块设备存储服务的 API 入口点
openstack endpoint create --region RegionOne volumev2 public http://ctl01:8776/v2/%\(project_id\)s
openstack endpoint create --region RegionOne volumev2 internal http://ctl01:8776/v2/%\(project_id\)s
openstack endpoint create --region RegionOne volumev2 admin http://ctl01:8776/v2/%\(project_id\)s
openstack endpoint create --region RegionOne volumev3 public http://ctl01:8776/v3/%\(project_id\)s
openstack endpoint create --region RegionOne volumev3 internal http://ctl01:8776/v3/%\(project_id\)s
openstack endpoint create --region RegionOne volumev3 admin http://ctl01:8776/v3/%\(project_id\)s
安装软件包
yum install -y openstack-cindercinder配置文件/etc/cinder/cinder.conf
openstack-config --set /etc/cinder/cinder.conf DEFAULT rpc_backend rabbit
openstack-config --set /etc/cinder/cinder.conf DEFAULT auth_strategy keystone
openstack-config --set /etc/cinder/cinder.conf DEFAULT my_ip 10.191.101.128
openstack-config --set /etc/cinder/cinder.conf DEFAULT transport_url  rabbit://openstack:Abc-1234@ctl01
openstack-config --set /etc/cinder/cinder.conf database connection mysql+pymysql://cinder:Abc-1234@ctl01/cinder
openstack-config --set /etc/cinder/cinder.conf oslo_messaging_rabbit rabbit_hosts ctl01:5672
openstack-config --set /etc/cinder/cinder.conf oslo_messaging_rabbit rabbit_userid openstack
openstack-config --set /etc/cinder/cinder.conf oslo_messaging_rabbit rabbit_password 'Abc-1234'
openstack-config --set /etc/cinder/cinder.conf keystone_authtoken auth_url http://ctl01:5000
openstack-config --set /etc/cinder/cinder.conf keystone_authtoken www_authenticate_uri http://ctl01:5000
openstack-config --set /etc/cinder/cinder.conf keystone_authtoken memcached_servers ctl01:11211
openstack-config --set /etc/cinder/cinder.conf keystone_authtoken auth_type password
openstack-config --set /etc/cinder/cinder.conf keystone_authtoken project_domain_name default
openstack-config --set /etc/cinder/cinder.conf keystone_authtoken user_domain_name default
openstack-config --set /etc/cinder/cinder.conf keystone_authtoken project_name service
openstack-config --set /etc/cinder/cinder.conf keystone_authtoken username cinder
openstack-config --set /etc/cinder/cinder.conf keystone_authtoken password 'Abc-1234'
openstack-config --set /etc/cinder/cinder.conf oslo_concurrency lock_path /var/lib/cinder/tmp
初始化块设备服务的数据库:
su -s /bin/sh -c "cinder-manage db sync" cinder配置计算服务以使用块设备存储
openstack-config --set /etc/nova/nova.conf cinder os_region_name RegionOne重启nova计算和cinder块存储服务并设置开机自启动
systemctl restart openstack-nova-api.service
systemctl restart openstack-cinder-api.service openstack-cinder-scheduler.service
systemctl enable openstack-cinder-api.service openstack-cinder-scheduler.service
存储节点配置
在控制节点(cinder01:10.191.101.131)上配置
安装LVM软件包
yum install -y lvm2 device-mapper-persistent-data启动LVM元数据服务
systemctl enable lvm2-lvmetad.service
systemctl restart lvm2-lvmetad.service
添加一块100G硬盘,重启节点后创建LVM物理卷/dev/sdb
pvcreate /dev/sdb创建LVM物理卷
vgcreate cinder-volumes /dev/sdb编辑配置文件/etc/lvm/lvm.conf,在devices部分,添加一个过滤器,只接受/dev/sdb设备,拒绝其他所有设备
vim /etc/lvm/lvm.conf
devices {
filter = [ "a/sdb/", "r/.*/" ]
安装train版yum源和cinder软件包
yum install centos-release-openstack-train
yum install openstack-cinder targetcli python-keystone openstack-utils
编辑配置文件/etc/cinder/cinder.conf
cp /etc/cinder/cinder.conf /etc/cinder/cinder.conf.bak
grep -Ev '#|^$' /etc/cinder/cinder.conf.bak>/etc/cinder/cinder.conf

my_ip=10.191.101.131
openstack-config --set /etc/cinder/cinder.conf  database  connection mysql+pymysql://cinder:Abc-1234@ctl01/cinder
openstack-config --set /etc/cinder/cinder.conf  DEFAULT transport_url rabbit://openstack:Abc-1234@ctl01
openstack-config --set /etc/cinder/cinder.conf  DEFAULT auth_strategy keystone
openstack-config --set /etc/cinder/cinder.conf  DEFAULT my_ip "$my_ip"
openstack-config --set /etc/cinder/cinder.conf  DEFAULT enabled_backends lvm
openstack-config --set /etc/cinder/cinder.conf  DEFAULT glance_api_servers http://ctl01:9292
openstack-config --set /etc/cinder/cinder.conf  keystone_authtoken www_authenticate_uri http://ctl01:5000
openstack-config --set /etc/cinder/cinder.conf  keystone_authtoken auth_url http://ctl01:5000
openstack-config --set /etc/cinder/cinder.conf  keystone_authtoken memcached_servers ctl01:11211
openstack-config --set /etc/cinder/cinder.conf  keystone_authtoken auth_type password
openstack-config --set /etc/cinder/cinder.conf  keystone_authtoken project_domain_name default
openstack-config --set /etc/cinder/cinder.conf  keystone_authtoken user_domain_name default
openstack-config --set /etc/cinder/cinder.conf  keystone_authtoken project_name service
openstack-config --set /etc/cinder/cinder.conf  keystone_authtoken username cinder
openstack-config --set /etc/cinder/cinder.conf  keystone_authtoken password Abc-1234
openstack-config --set /etc/cinder/cinder.conf  lvm volume_driver cinder.volume.drivers.lvm.LVMVolumeDriver
openstack-config --set /etc/cinder/cinder.conf  lvm volume_group cinder-volumes
openstack-config --set /etc/cinder/cinder.conf  lvm target_protocol iscsi
openstack-config --set /etc/cinder/cinder.conf  lvm target_helper lioadm
openstack-config --set /etc/cinder/cinder.conf  oslo_concurrency lock_path /var/lib/cinder/tmp
启动块存储卷服务并设置开机自启动
systemctl restart openstack-cinder-volume.service target.service
systemctl enable openstack-cinder-volume.service target.service
在控制节点验证服务
source admin-openrc
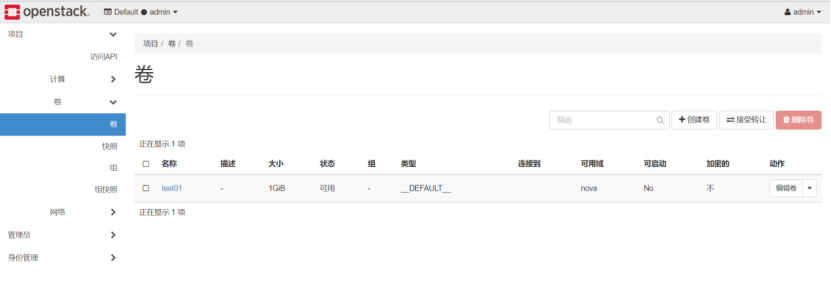
openstack volume service list在dashboard查看
创建卷测试
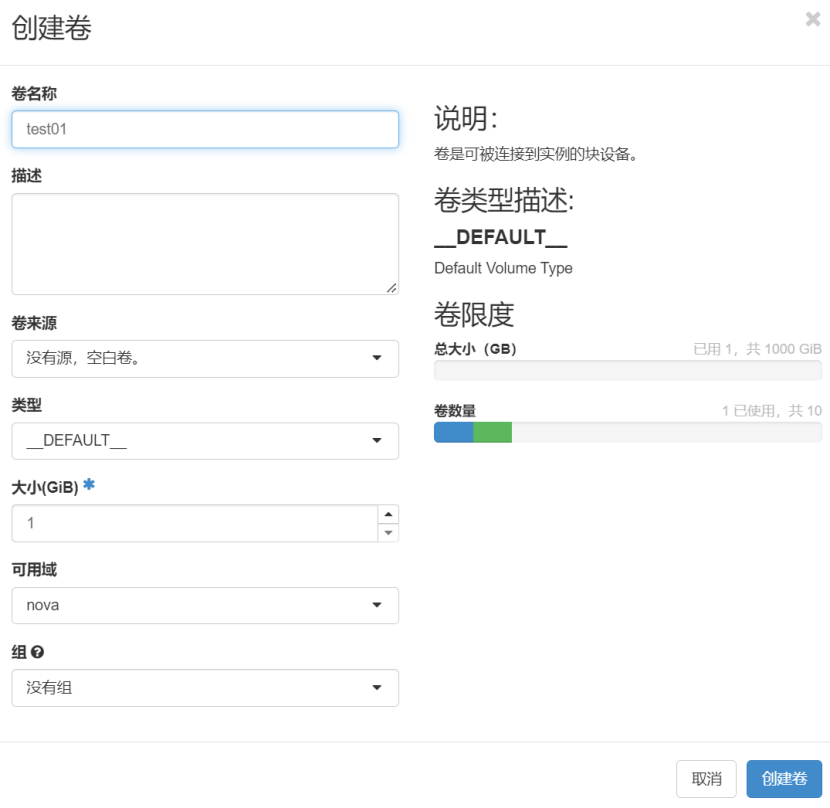
Openstack使用
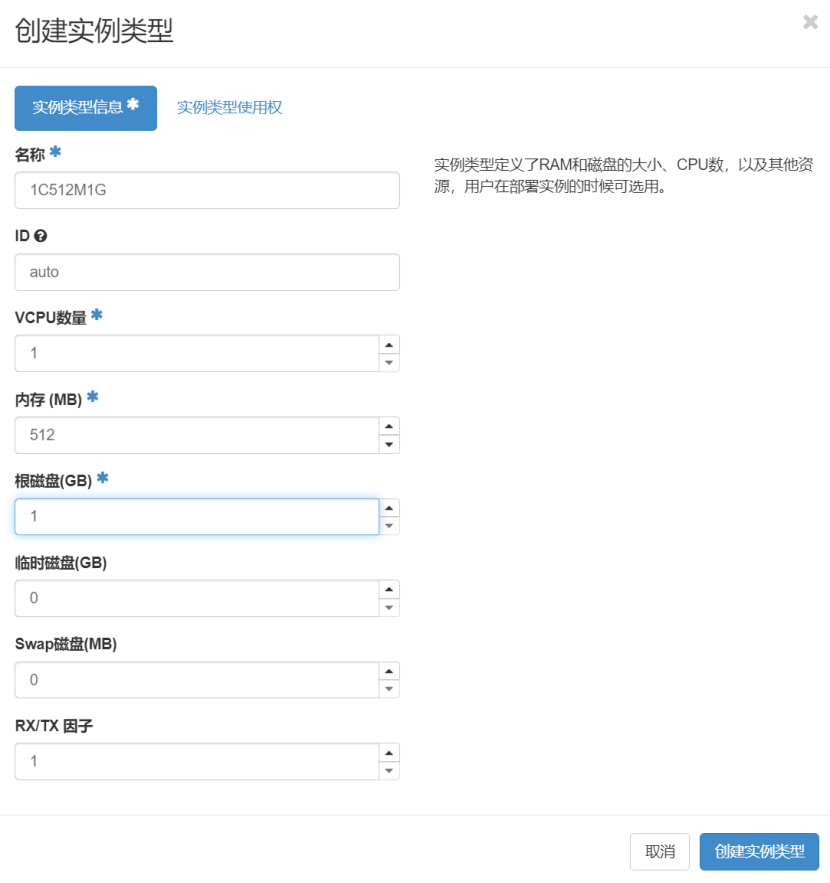
从cirros镜像创建卷测试创建虚拟机

创建实例类型
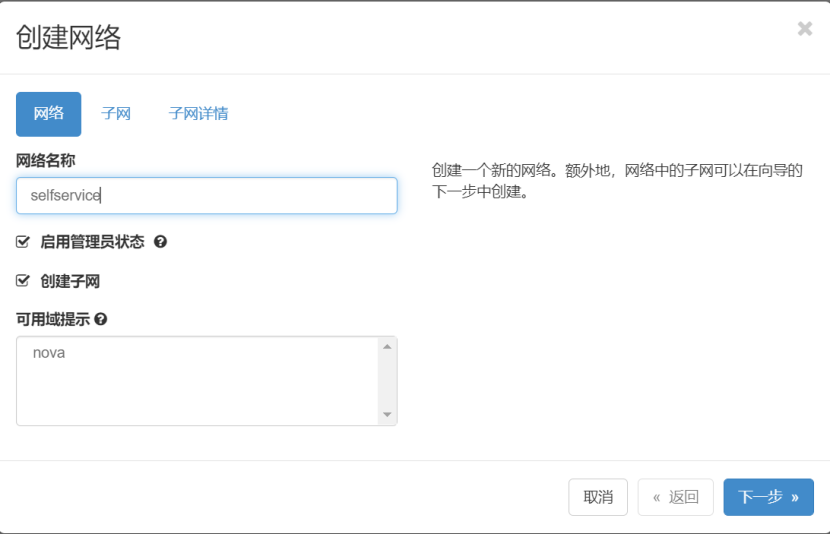
建立公共提供商网络
创建网络
在admin管理员下创建
openstack network create --share --external --provider-physical-network provider --provider-network-type flat provider参数理解:
--share 允许所有项目使用虚拟网络
--external 将虚拟网络定义为外部,如果想创建一个内部网络,则可以使用--internal。默认值为internal
--provider-physical-network provider
# 指明物理网络的提供者,provider 与下面neutron的配置文件对应,其中provider是标签,可以更改为其他,但是2个地方必须要统一


# 配置文件/etc/neutron/plugins/ml2/ml2_conf.ini中的参数
[ml2_type_flat]
flat_networks = provider
[linux_bridge]
physical_interface_mappings = provider:ens33

--provider-network-type flat 指明这里创建的网络是flat类型,即实例连接到此网络时和物理网络是在同一个网段,无vlan等功能。

最后输入的provider 指定网络的名称
创建子网
在网络上创建一个子网 10.191.101.0/24 ; 子网对应真实的物理网络
openstack subnet create --network provider \
  --allocation-pool start=10.191.101.10,end=10.191.101.20 \
  --dns-nameserver 10.191.101.2 --gateway 10.191.101.2 \
  --subnet-range 10.191.101.0/24 provider

# 参数解释:
--network provider 指定父网络
--allocation-pool start=10.191.101.10,end=10.191.101.20 指定子网的起始地址和终止地址
--dns-nameserver 10.191.101.2 指定DNS服务器地址
--gateway 10.191.101.2 指定网关地址
--subnet-range 10.191.101.0/24 指定子网的网段

最后的provider 指定子网的名称
创建实例
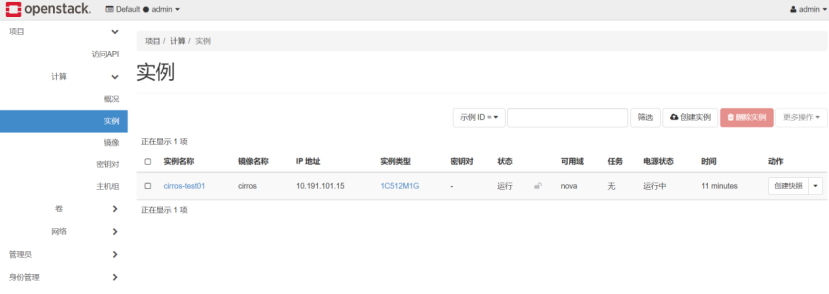
测试网络
建立普通租户的私有自助服务网络
创建网络
自助服务网络,也叫租户网络或项目网络,它是由openstack租户创建的,完全虚拟的,是租户私有的,只在本网络内部连通,不能在租户之间共享
在普通租户下创建网络,当前使用账号myuser,重置密码为Abc-1234
非特权用户通常无法为该命令提供其他参数,该服务使用以下配置文件中的信息自动选择参数
cat /etc/neutron/plugins/ml2/ml2_conf.ini
[ml2]
type_drivers = flat,vlan,vxlan
tenant_network_types = vxlan
[ml2_type_vxlan]
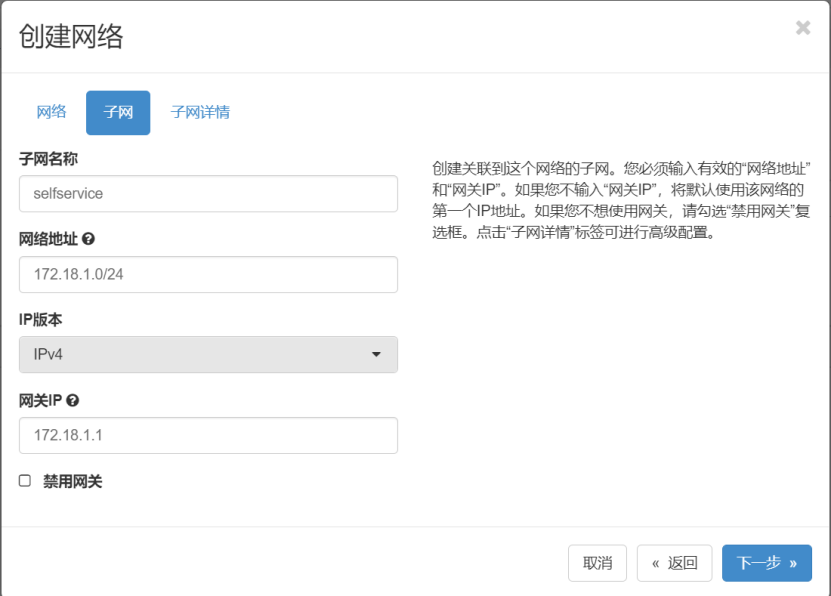
vni_ranges = 1:1000创建子网
创建一个子网 172.18.1.0/24
创建路由
使用命令创建,配置myuser环境变量
cat myuser-openrc

export OS_USERNAME=myuser
export OS_PASSWORD=Abc-1234
export OS_PROJECT_NAME=myproject
export OS_USER_DOMAIN_NAME=Default
export OS_PROJECT_DOMAIN_NAME=Default
export OS_AUTH_URL=http://ctl01:5000/v3
export OS_IDENTITY_API_VERSION=3
查看已创建的网络
openstack network list查看已创建的子网
openstack subnet list创建路由器,用myuser普通租户创建
source ~/myuser-openrc
openstack router create router01
查看创建的路由
openstack router list将创建的租户自助服务网络子网添加为路由器上的接口
openstack router add subnet router01 selfservice在路由器的公共提供商网络上设置网关
openstack router set router01 --external-gateway providerIp nets
[root@ctl01 ~]# ip netns
qrouter-7962017d-fd01-4863-aae0-329fd704bc78 (id: 1)
qdhcp-28e70282-9aff-4048-8e17-9a2879f9eab2 (id: 0)
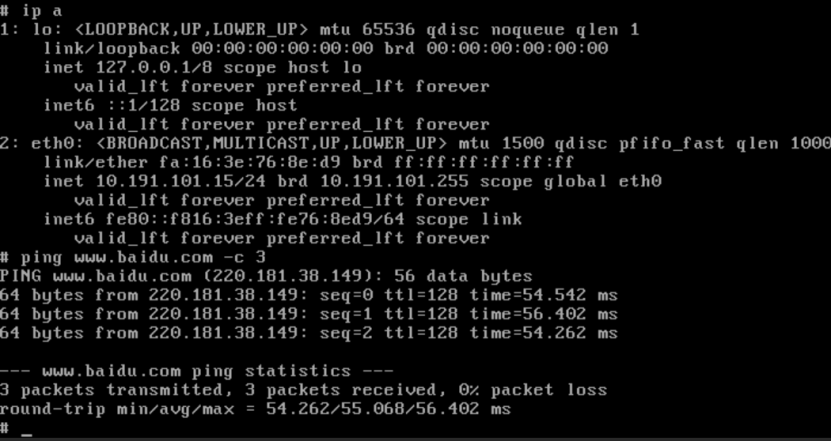
# 使用ip netns命令找到这个虚拟路由器之后,用这个虚拟路由器ping真实物理网络中的网关,ping通即证明OpenStack内部虚拟网络与真实物理网络衔接成功
[root@ctl01 ~]# ip netns
qrouter-7962017d-fd01-4863-aae0-329fd704bc78 (id: 1)
qdhcp-28e70282-9aff-4048-8e17-9a2879f9eab2 (id: 0)
[root@ctl01 ~]# ip netns exec qrouter-7962017d-fd01-4863-aae0-329fd704bc78 ping 10.191.101.2
PING 10.191.101.2 (10.191.101.2) 56(84) bytes of data.
64 bytes from 10.191.101.2: icmp_seq=1 ttl=128 time=0.663 ms
64 bytes from 10.191.101.2: icmp_seq=2 ttl=128 time=0.235 ms验证查看创建网络和子网中的IP地址范围,回到admin用户下
列出路由器上的端口,以确定提供商网络上的网关IP地址
openstack port list --router router01
+--------------------------------------+------+-------------------+------------------------------------------------------------------------------+--------+
| ID                                   | Name | MAC Address       | Fixed IP Addresses                                                           | Status |
+--------------------------------------+------+-------------------+------------------------------------------------------------------------------+--------+
| 2cfa2e4b-3b57-4aa3-af77-59eca94242eb |      | fa:16:3e:56:7f:9a | ip_address='172.18.1.1', subnet_id='1213f505-8e0d-4b5e-b7b9-f659aaf92486'    | ACTIVE |
| be99fadb-47fd-4247-b504-baf00d810f8d |      | fa:16:3e:8e:1a:4d | ip_address='10.191.101.13', subnet_id='4f7508fd-b250-44b8-be9c-f2d840abd852' | ACTIVE |
+--------------------------------------+------+-------------------+------------------------------------------------------------------------------+--------+
Ceph安装
节点规划:单节点
| ceph01(可选) | ceph单节点 | 10.191.101.140/24 | 192.168.80.140/24 | 1C2G |
系统版本
cat /etc/redhat-release
CentOS Linux release 7.6.1810 (Core)
自动补全
yum install -y bash-completion主机名
hostnamectl set-hostname ceph01Yum配置
rm /etc/yum.repos.d/* -rf
curl http://mirrors.aliyun.com/repo/Centos-7.repo > /etc/yum.repos.d/Centos-7.repo
curl http://mirrors.aliyun.com/repo/epel-7.repo > /etc/yum.repos.d/epel.repo
Ceph yum源
vi  /etc/yum.repos.d/ceph.repo
[Ceph]
name=Ceph packages for $basearch
baseurl=http://download.ceph.com/rpm-mimic/el7/$basearch
enabled=1
gpgcheck=1
type=rpm-md
gpgkey=https://download.ceph.com/keys/release.asc
priority=1
[Ceph-noarch]
name=Ceph noarch packages
baseurl=http://download.ceph.com/rpm-mimic/el7/noarch
enabled=1
gpgcheck=1
type=rpm-md
gpgkey=https://download.ceph.com/keys/release.asc
priority=1
[ceph-source]
name=Ceph source packages
baseurl=http://download.ceph.com/rpm-mimic/el7/SRPMS
enabled=1
gpgcheck=1
type=rpm-md
gpgkey=https://download.ceph.com/keys/release.asc
priority=1
Hosts配置(对接openstack,同步添加openstack节点)
hostnamectl set-hostname ceph01
cat >> /etc/hosts << ‘EOF’
10.191.101.140 $HOSTNAME
10.191.101.128 ctl01
10.191.101.129 compute01
10.191.101.130 neutron01
10.191.101.131 cinder01
EOF
关闭selinux和防火墙
setenforce 0
sed -i 's/SELINUX=.*/SELINUX=disabled/' /etc/selinux/config
systemctl stop firewalld
systemctl disable firewalld
systemctl mask firewalld
安装软件
yum clean all && yum makecache
yum -y install ceph-deploy epel-release python-pip ceph ceph-radosgw chrony
部署ceph集群
cd /etc/ceph/
ceph-deploy new $HOSTNAME
单节点配置需要修改配置
cat >> /etc/ceph/ceph.conf << EOF
osd pool default size = 1
osd crush chooseleaf type = 0
osd max object name len = 256
osd journal size = 128
EOF
安装ceph节点
export CEPH_DEPLOY_REPO_URL=http://mirrors.aliyun.com/ceph/rpm-nautilus/el7/
export CEPH_DEPLOY_GPG_URL=http://mirrors.aliyun.com/ceph/keys/release.asc
ceph-deploy install $HOSTNAME
查看版本
ceph --version使用ceph-deploy进行部署,在更新的版本中,该工具已被弃用 初始化监视节点和同步所有配置文件到 /etc/ceph/ 下
ceph-deploy mon create-initial
ceph-deploy admin $HOSTNAME
节点下创建manager
ceph-deploy mgr create $HOSTNAME添加osd
ceph-deploy osd create --data /dev/sdX $HOSTNAME部署完成,检查单节点ceph部署情况
ceph -sDashboard配置
在每个mgr节点安装
yum install ceph-mgr-dashboard开启mgr功能
ceph mgr module enable dashboard生成并安装自签名的证书
ceph dashboard create-self-signed-cert创建一个dashboard登录用户名密码
# 密码写入文件中,命令行从文件中读入密码
[root@ceph01 ~]# ceph dashboard ac-user-create guest -i ceph-passwd.txt  administrator
{"username": "guest", "lastUpdate": 1702966284, "name": null, "roles": ["administrator"], "password": "$2b$12$qKgRIUT1xz41kJjeUqsQm.h.ktyN.QA4981Kw5OUoY1Ea.uCuRAA2", "email": null}
查看服务访问方式
[root@ceph01 ~]# ceph mgr services
{
    "dashboard": "https://ceph01:8443/"
}
# 若未配置域名解析则通过ip访问
Ceph常用命令
OSD维护命令
# 显示Ceph集群中的OSD树,包括每个OSD的状态和位置
ceph osd tree

# 显示Ceph集群中的OSD状态摘要信息
ceph osd stat

# 显示Ceph集群中的所有pool
ceph osd pool ls

# 显示pool中详细的volume信息
rbd --pool <pool_name> ls

# 将指定的OSD标记为“离线”,从集群中排除
ceph osd out <osd-id>

# 将指定的OSD标记为“在线”,重新加入集群
ceph osd in <osd-id>

# 为存储池设置副本大小
ceph osd pool set <pool_name> size <replica_size>
Monitor维护命令
# 显示Ceph集群中监视器的状态信息
ceph mon stat

# 显示Ceph集群中监视器的详细信息
ceph mon dump

# 从Ceph集群中移除指定的监视器
ceph mon remove <mon-id>
PG维护命令
# 显示Ceph集群中PG(placement group)的状态信息
ceph pg stat

# 修复指定的PG,解决可能的一致性问题
ceph pg repair <pg-id>

# 对指定的PG执行“scrub”操作,检查和修复数据
ceph pg scrub <pg-id>
健康状态命令
# 检查Ceph集群的健康状态
ceph health

# 显示详细的Ceph集群健康状态信息
ceph health detail

# 运行指定的健康检查
ceph health check <check-name>
管理Ceph配置文件
# 显示Ceph集群的配置信息
ceph config show

# 设置指定的Ceph配置项
ceph config set <key> <value>

# 获取指定的Ceph配置项的值
ceph config get <key>
常见告警处理
1 monitors have not enabled msgr2
ceph mon enable-msgr2msgr2是Ceph的新消息传输协议,它提供了更好的性能和安全性
mon is allowing insecure global_id reclaim
# 禁用不安全模式
 ceph config set mon auth_allow_insecure_global_id_reclaim false
这个警告表示Ceph监视器正在允许不安全的全局ID回收。全局ID是Ceph集群中的唯一标识符,用于识别对象和其他元数据。不安全的全局ID回收可能会导致ID冲突和数据不一致的问题
对接OpenStack
通常,OpenStack有3个地方可以和Ceph存储进行对接: 1、Images:OpenStack 的 Glance 管理着 VM 的 image 。Image 相对恒定,OpenStack 把它们当作二进制文件、并以此格式下载; 2、Volumes:OpenStack 用 Cinder 服务管理 Volumes 。Volume 是块设备,OpenStack 用它们引导虚拟机、或挂载到运行中的虚拟机上; 3、Guest Disks: Guest disks 是装有客户操作系统的磁盘。默认情况下,启动一台虚拟机时,它的系统盘表现为 hypervisor 文件系统的一个文件(通常位于 /var/lib/nova/instances/${uuid}/);
安装ini配置工具
yum install crudini 在glance-api的主机上安装python-rbd包
yum install python-rbd在nova-compute(所有计算节点)、cinder-volume节点上安装ceph-common包
- 在控制节点运行命令检查对应服务所在的节点
openstack volume service list
+------------------+--------------+------+---------+-------+----------------------------+
| Binary           | Host         | Zone | Status  | State | Updated At                 |
+------------------+--------------+------+---------+-------+----------------------------+
| cinder-scheduler | ctl01        | nova | enabled | up    | 2023-12-19T08:03:42.000000 |
| cinder-volume    | cinder01@lvm | nova | enabled | up    | 2023-12-19T08:03:42.000000 |
+------------------+--------------+------+---------+-------+----------------------------+- 在对应节点执行安装
yum install ceph-common把ceph集群的/etc/ceph/ceph.conf 、/etc/ceph/ceph.client.admin.keyring 文件拷贝到以上openstack各节点的/etc/ceph目录下,确保以上openstack各对应节点成为ceph集群的客户端
在ceph集群创建三个pool ,分别对应上文三个模块。以后所有的OpenStack虚拟机数据都会存储到这三个池中。
创建volumes池,对应Cinder服务
ceph osd pool create os_volumes 100创建images池,对应Glance服务
ceph osd pool create os_images 100创建vms池,对应Nova服务
ceph osd pool create os_vms 100设置存储池副本数量
[root@ceph01 ~]# ceph osd pool set os_vms size 1
set pool 3 size to 1
[root@ceph01 ~]# ceph osd pool set os_images size 1
set pool 2 size to 1
[root@ceph01 ~]# ceph osd pool set os_volumes size 2
set pool 1 size to 2
在ceph集群创建cinder、glance等用户,并做权限控制
[root@ceph01 ~]# ceph auth get-or-create client.cinder mon 'allow r' osd 'allow class-read object_prefix rbd_children, allow rwx pool=os_volumes, allow rwx pool=os_vms, allow rx pool=os_images'
[client.cinder]
        key = AQAMVYFl0ExWCxAAT632K3WB+5VtaXh3bp8DzA==
[root@ceph01 ~]# ceph auth get-or-create client.glance mon 'allow r' osd 'allow class-read object_prefix rbd_children, allow rwx pool=os_images'
[client.glance]
        key = AQAPVYFlceRZBBAA/V5Cg7SEC6TUZo543/H0tQ==
(在ceph端执行)将上面生成的keyring文件,保存在glance和volume节点上,并修改为相应的权限
ceph auth get-or-create client.glance | ssh ctl01 sudo tee /etc/ceph/ceph.client.glance.keyring
ssh ctl01 sudo chown glance:glance /etc/ceph/ceph.client.glance.keyring

ceph auth get-or-create client.cinder | ssh cinder01 sudo tee /etc/ceph/ceph.client.cinder.keyring
ssh cinder01 sudo chown cinder:cinder /etc/ceph/ceph.client.cinder.keyring
在nova-compute节点(所有计算节点)上保存和cinder-volume相同的keyring
ceph auth get-or-create client.cinder | ssh compute01 sudo tee /etc/ceph/ceph.client.cinder.keyring
ssh compute01 sudo chown nova:nova /etc/ceph/ceph.client.cinder.keyring
compute 节点配置
在openstack集群所有compute节点libvirt上添加secret key
- 从ceph集群获取cinder keyring,并保存到nova-comute对应节点/root目录下一个临时文件中
ceph auth get-key client.cinder | ssh compute01 tee client.cinder.key 执行完后nova-compute节点的/root下会出现临时的文件
- 在compute节点生成一个UUID
uuidgen比如生成:912f054c-478b-44b7-bfc5-f0bbed491fbb
- /root下touch一个文件 secret.xml 内容如下:
   <secret ephemeral='no' private='no'>
          <uuid>912f054c-478b-44b7-bfc5-f0bbed491fbb</uuid>
          <usage type='ceph'>
          <name>client.cinder secret</name>
          </usage>
    </secret>
通过libvirt工具(virsh)定义和设置秘钥,并在设置秘钥值后删除相关的秘钥和XML文件
[root@compute01 ~]# virsh secret-define --file secret.xml
Secret 912f054c-478b-44b7-bfc5-f0bbed491fbb created

[root@compute01 ~]# virsh secret-set-value --secret 912f054c-478b-44b7-bfc5-f0bbed491fbb --base64 $(cat client.cinder.key) && rm client.cinder.key secret.xml
Secret value set

rm: remove regular file ‘client.cinder.key’? y
rm: remove regular file ‘secret.xml’? y
配置nova-compute节点/etc/nova/nova.conf中添加如下:
[libvirt]
images_type = rbd
images_rbd_pool = os_vms
images_rbd_ceph_conf = /etc/ceph/ceph.conf
rbd_user = cinder
rbd_secret_uuid = 912f054c-478b-44b7-bfc5-f0bbed491fbb
disk_cachemodes="network=writeback"
对应节点重启服务:
systemctl restart openstack-nova-compute glance 节点配置
配置glance节点/etc/glance/glance-api.conf对接ceph
crudini --set /etc/glance/glance-api.conf DEFAULT "show_image_direct_url" "True"
crudini --set /etc/glance/glance-api.conf glance_store "default_store" "rbd"
crudini --set /etc/glance/glance-api.conf glance_store "rbd_store_user" "glance"
crudini --set /etc/glance/glance-api.conf glance_store "rbd_store_pool" "os_images"
crudini --set /etc/glance/glance-api.conf glance_store "stores" "glance.store.filesystem.Store, glance.store.http.Store, glance.store.rbd.Store"
crudini --set /etc/glance/glance-api.conf paste_deploy "flavor" "keystone"
crudini --set /etc/glance/glance-api.conf glance_store "rbd_store_chunk_size" "8"
crudini --set /etc/glance/glance-api.conf glance_store "rbd_store_ceph_conf" "/etc/ceph/ceph.conf"
在DEFAULT域中增加:
[DEFAULT]
default_store = rbd
# 默认是file,要修改
在glance_store域中增加如下,如果没有glance_store域,直接创建:
[glance_store]
stores = rbd
rbd_store_pool = os_images
rbd_store_user = glance
rbd_store_ceph_conf = /etc/ceph/ceph.conf
rbd_store_chunk_size = 8
对应节点重启服务:
systemctl restart openstack-glance-api cinder 节点配置
配置cinder节点的/etc/cinder/cinder.conf对接ceph
crudini --set /etc/cinder/cinder.conf DEFAULT "enabled_backends" "lvm,ceph" # 同时支持lvm、ceph
crudini --set /etc/cinder/cinder.conf ceph "volume_driver" "cinder.volume.drivers.rbd.RBDDriver"
crudini --set /etc/cinder/cinder.conf ceph "volume_backend_name" "ceph"
crudini --set /etc/cinder/cinder.conf ceph "rbd_pool" "os_volumes"
crudini --set /etc/cinder/cinder.conf ceph "rbd_ceph_conf" "/etc/ceph/ceph.conf"
crudini --set /etc/cinder/cinder.conf ceph "rbd_flatten_volume_from_snapshot" "false"
crudini --set /etc/cinder/cinder.conf ceph "rbd_max_clone_depth" "5"
crudini --set /etc/cinder/cinder.conf ceph "rbd_store_chunk_size" "4"
crudini --set /etc/cinder/cinder.conf ceph "rados_connect_timeout" "-1"
crudini --set /etc/cinder/cinder.conf ceph "glance_api_version" "2"
crudini --set /etc/cinder/cinder.conf ceph "rbd_user" "cinder"
crudini --set /etc/cinder/cinder.conf ceph "rbd_secret_uuid" "912f054c-478b-44b7-bfc5-f0bbed491fbb"
对应节点重启服务:
systemctl restart openstack-cinder-volume 验证
openstack的dashboard中测试创建卷、生成镜像和卷生成虚拟机等操作
查看 volume service
openstack volume service list创建 volume type
openstack volume type create lvm